Homemade Sourdough Challah
This website contains affiliate links.
Some of the links below are affiliate links. This means that, at no additional cost to you, Bread By Elise may earn a commission if you click through the link and finalize a purchase. Please read our Privacy Policy for more details.
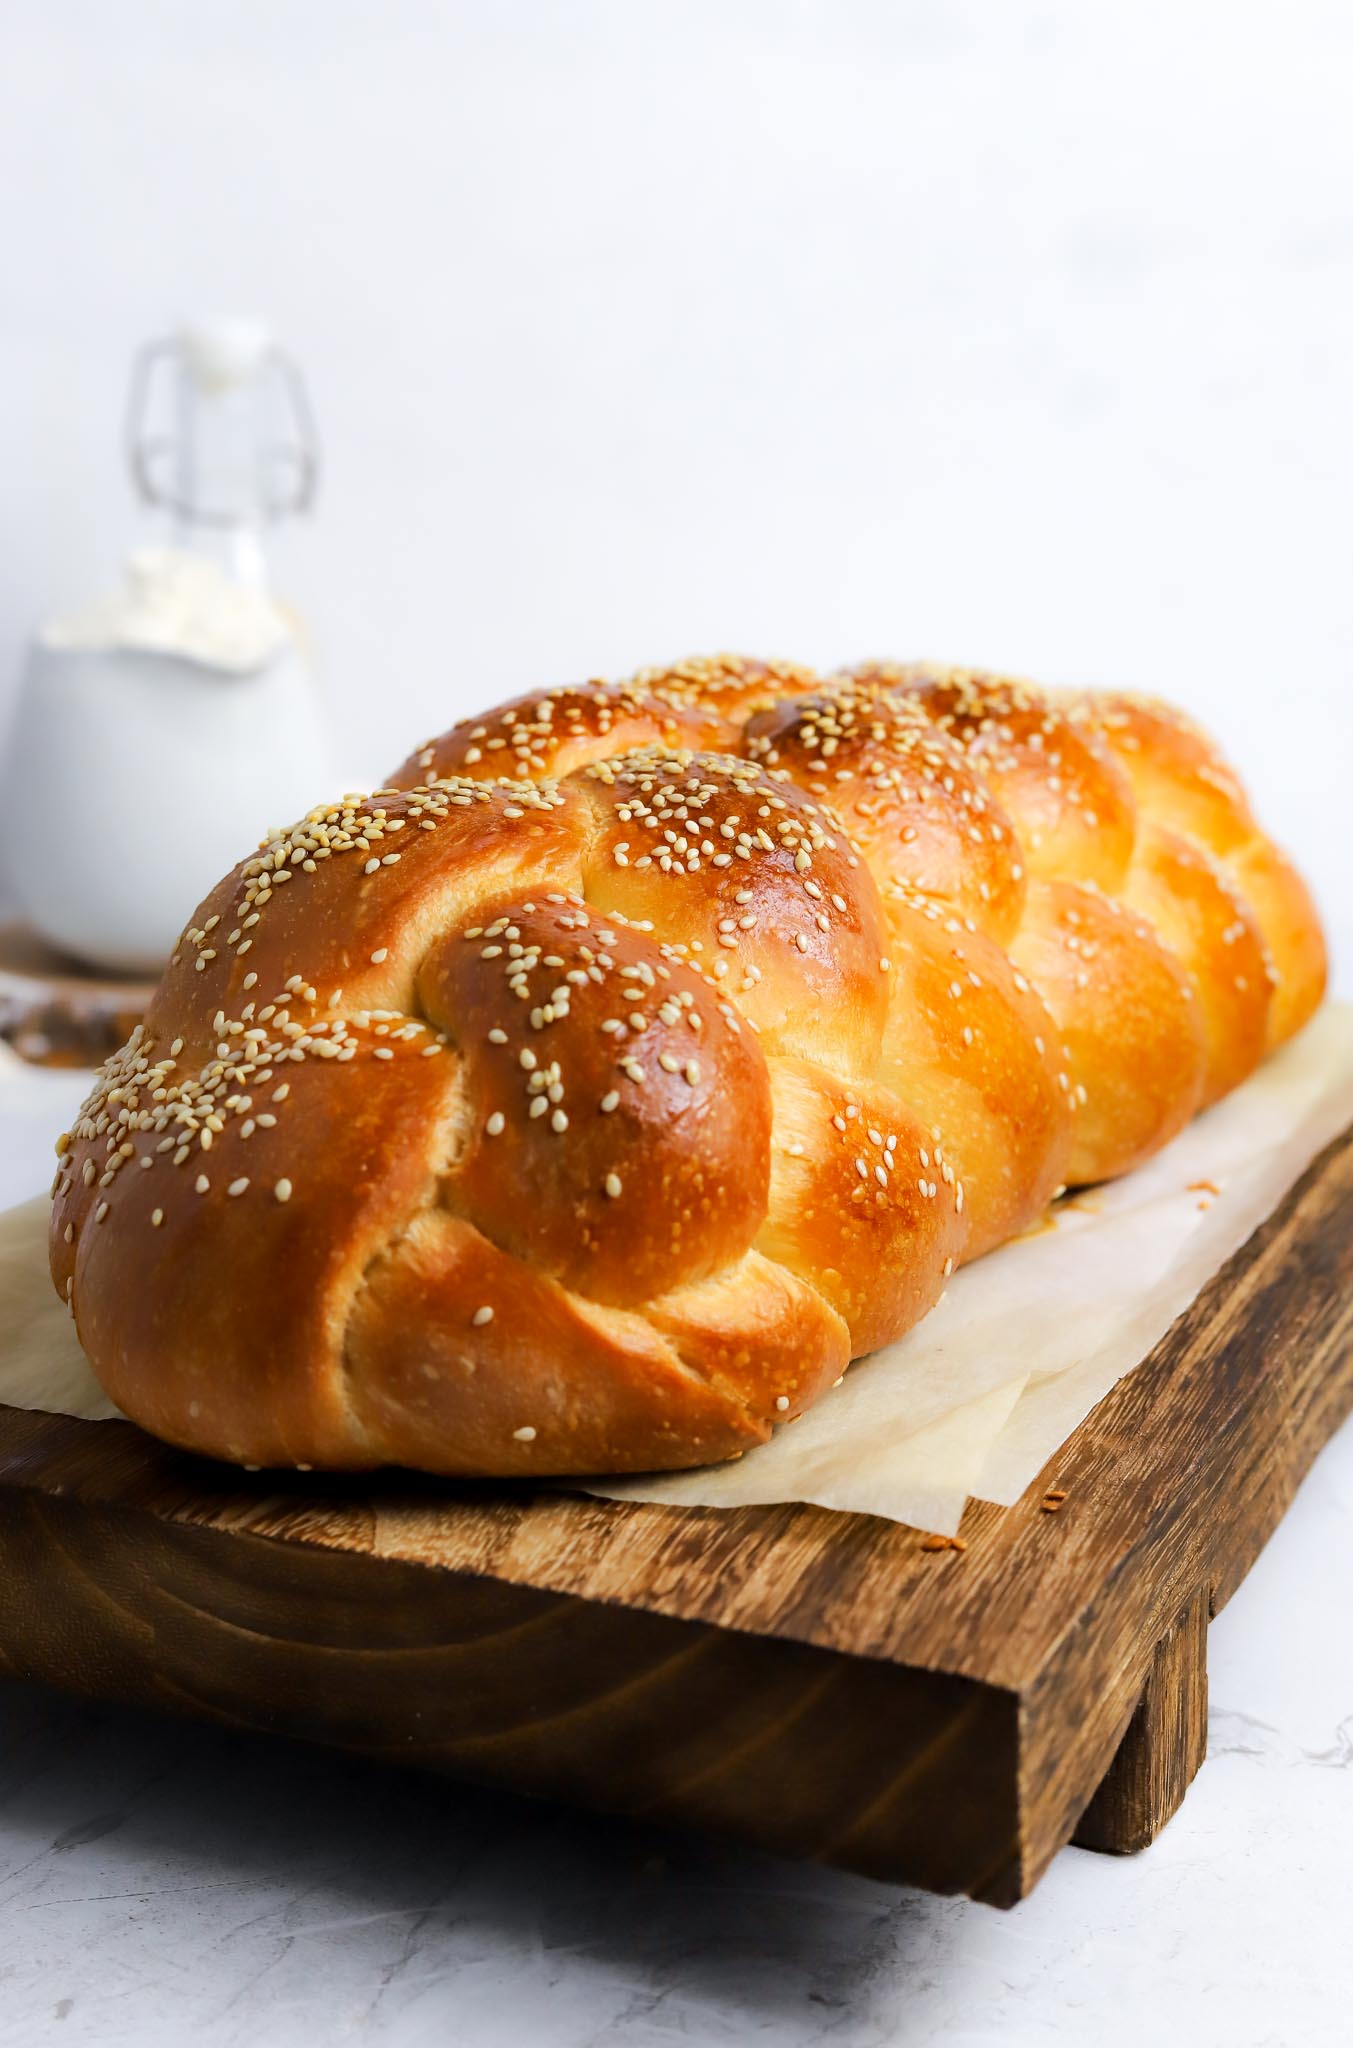
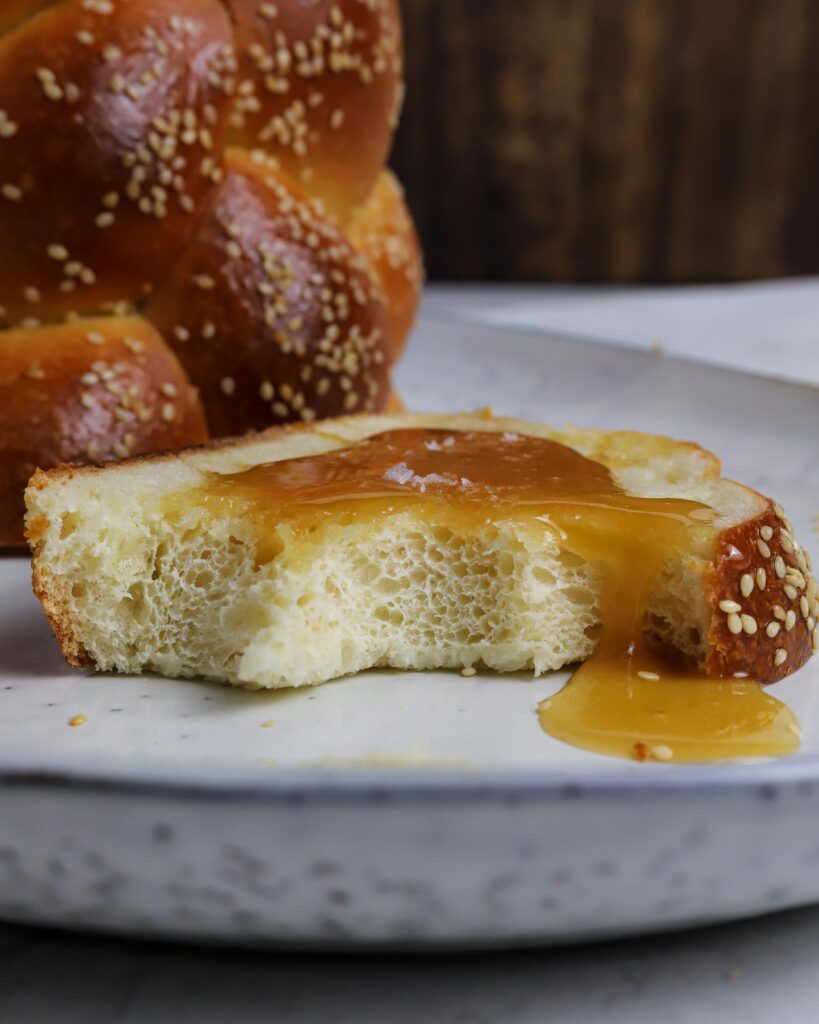
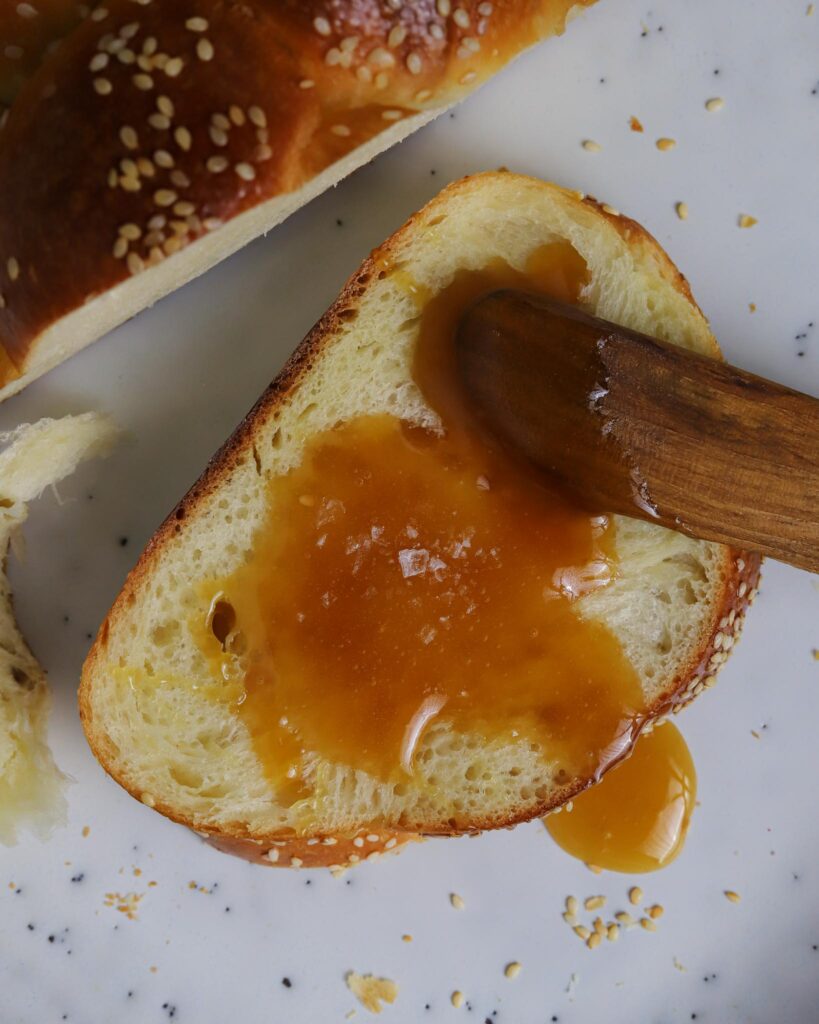
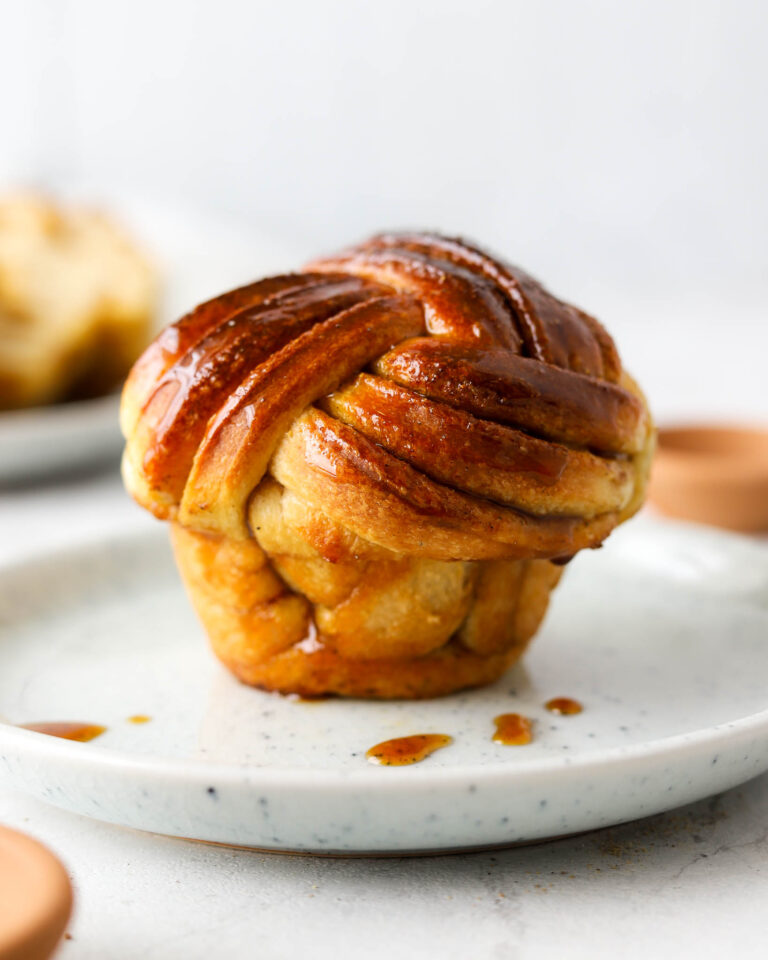
This beautiful Sourdough Challah has a pillowy soft crumb and golden brown, incredibly flavorful crust that will impress everyone around the table.
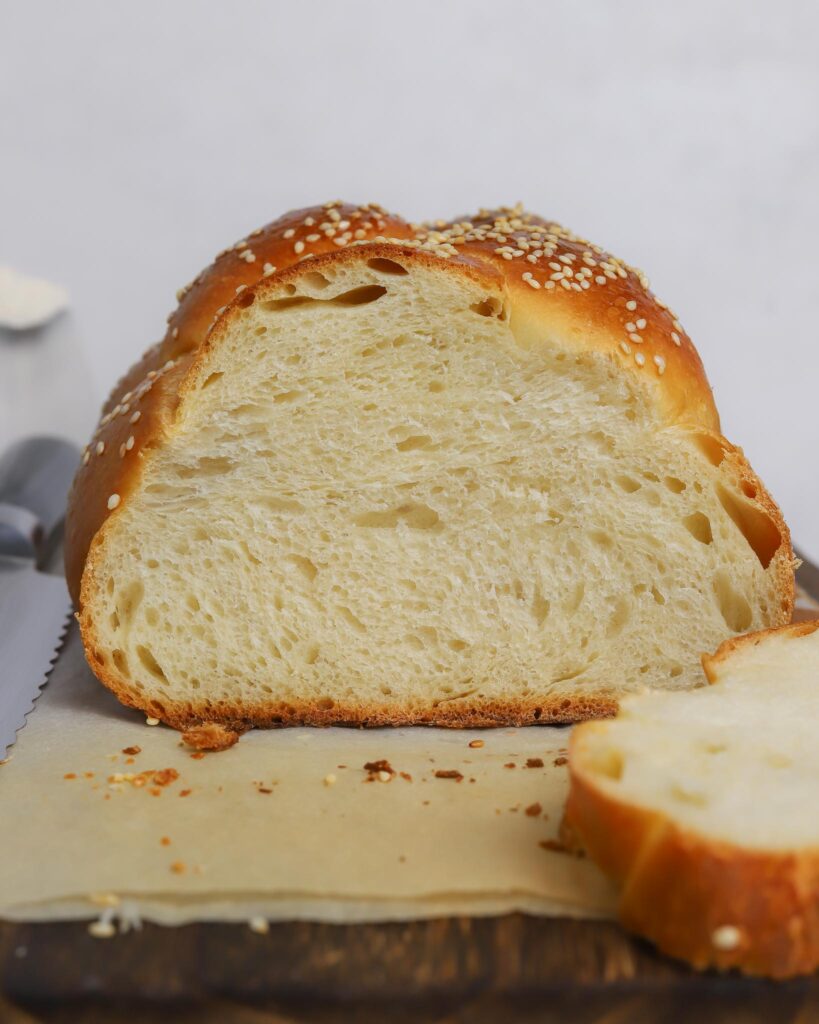
Table of contents
Homemade Sourdough Challah
Challah comes in various sizes and shapes and is a traditional Jewish bread made for Sabbath and most Jewish holidays. It is an enriched dough made with eggs, oil, and honey. It has some similarities to the French brioche, although it is not as rich in texture or flavor and does not contain any butter or milk.
As with all of my sourdough recipes, there is some waiting involved in making this bread. To help plan out your bake, I have included a baker’s schedule at the end of this post. Please also make sure to read through the whole recipe before you begin.
Recipe run through
Day one
Day two

- Divide the dough – Dump the dough onto your work surface. It’s usually not necessary to flour the work surface at this point. The dough should be cold and relatively stiff and shouldn’t stick to your hands or surface. I’m doing a 6-strand plait. But feel free to divide the dough into as many pieces as you want strands in your braid. Make sure to use your scale so that each piece ends up being the same size. Now roll each dough piece into rounds and cover with an oiled piece of plastic wrap. Rest for 10 minutes.
If you don’t want to do a 6-strand plait, you can also divide the dough into three and do a simple 3-strand braid for an easier approach to the braided challah (it will still look beautiful).
Scroll to view all images.
- Flatten the dough rounds – With a rolling pin, roll each round into rectangles about 8 in/20 cm long. Grab one of the long sides of the rectangle, roll it up tightly like a roulade, and pinch the seam to seal. Suppose the dough resists you at any point, cover and let it rest for a couple of minutes. Repeat on all six dough rounds. Cover the roulades and rest for another 10 minutes.
- Extend into strands – Use your hands to roll and extend the roulades into 16-18 in/40-45 cm strands. I like to do this in two rounds; I’ll start with strand 1 and extend it until it starts to resist me, then I’ll continue with strand 2, extend until it resists, and repeat with all the strands. Then, I’ll start with strand 1 again and extend it until it reaches the desired length of 16-18 in/40-45 cm.
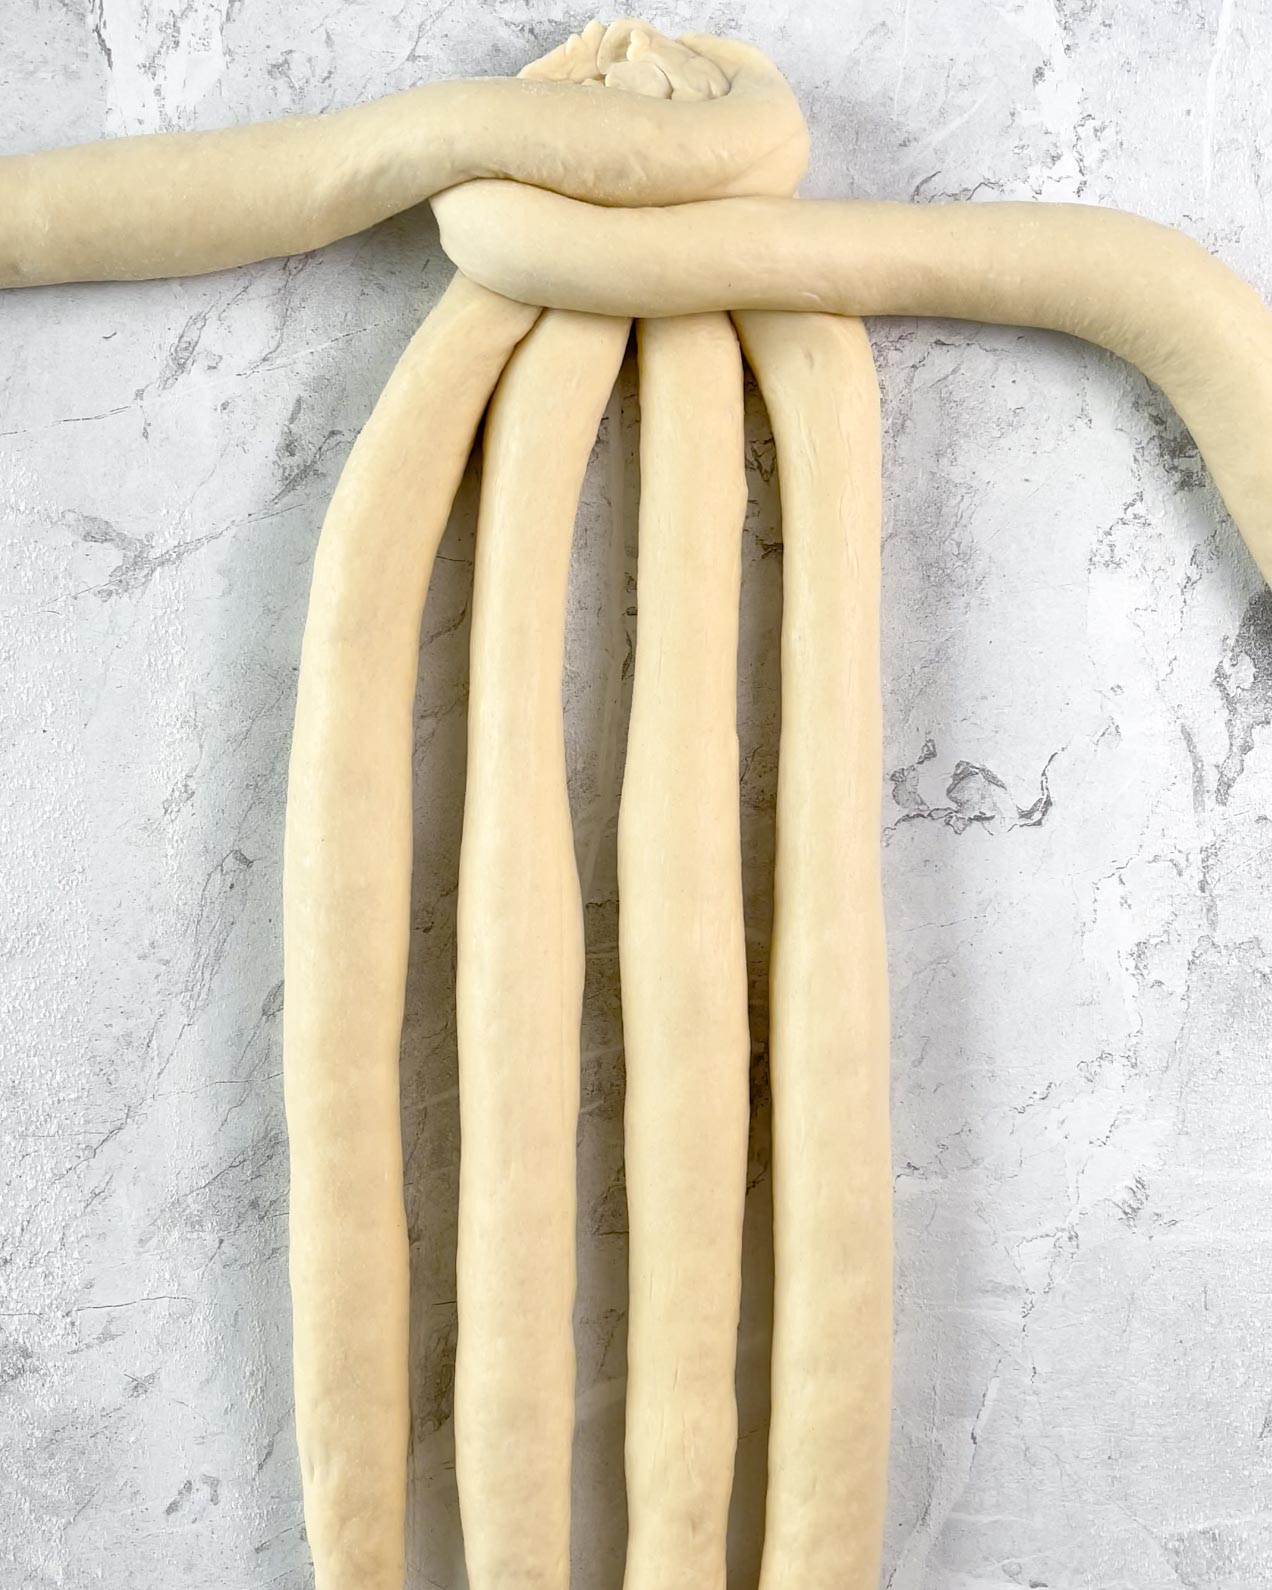
- Arrange the strands for braiding – Flour your work surface, and if your dough strands are a little sticky, lightly flour those as well. Use a pastry brush to remove excess flour, and be sure not to use too much. Then, arrange the strands side by side – group together at the top and pinch to fasten.
Video tutorial: How to Braid a 6-Strand Sourdough Challah
- Final proof – Once you’ve finished shaping your challah, transfer it to a lined baking tray and let it rise for 4-6 hours at around 78°F/26°C. Proof for 4-6 hours, or until the challah has risen and is nicely puffed up. The bread should jiggle when you shake the tray.
- Bake – Preheat the oven to 350°F/180°C, brush the challah with egg wash, sprinkle with sesame seeds, and finally bake for 25-35 minutes, until golden brown. Internal temperature should be at 95°C/203°F when it is done.
Shop the Tools


How To Make Sourdough Challah
Ingredients
Levain
- 35 g active sourdough starter
- 35 g water at around 78°F/26°C
- 35 g bread flour
Main Dough
- 185 g water at around 75°F/24°C
- 100 g levain
- 100 g eggs approx. 2 medium eggs
- 40 g honey
- 500 g bread flour
- 10 g salt
- 40 g neutral oil I prefer sunflower oil
Egg wash
- 1 egg
- 1 tbsp water
Toppings
- sesame seeds
Instructions
Levain
- Add the active sourdough starter, water, and flour to a bowl. Mix until combined, cover, and rest in a warm spot for four hours or until the levain has doubled in size.35 g active sourdough starter, 35 g water, 35 g bread flour
Main Dough
- In the bowl of your stand mixer, combine water, levain, eggs, and honey. Add flour to the bowl, turn the mixer on, and mix for about 2 minutes until the dough comes together. You want to use the dough hook attachment for this. Cover the bowl and autolyse/rest for 30 minutes.185 g water, 100 g levain, 40 g honey, 100 g eggs, 500 g bread flour
- Turn the mixer on again and add the salt and 1/4 of the oil. Knead for 2 minutes or until the oil is thoroughly mixed in. Then, add another part of the oil and knead on low-medium speed until fully incorporated. Repeat until all the oil has been added. This dough is on the stiffer side, so depending on your mixer, you might have to squeeze the dough with your hands a little to thoroughly mix in the oil. Be patient with this part. The key is to add a little oil at a time.10 g salt, 40 g neutral oil
- Once you have added all the oil, knead for 5-10 minutes on low-medium until the dough passes the windowpane test.
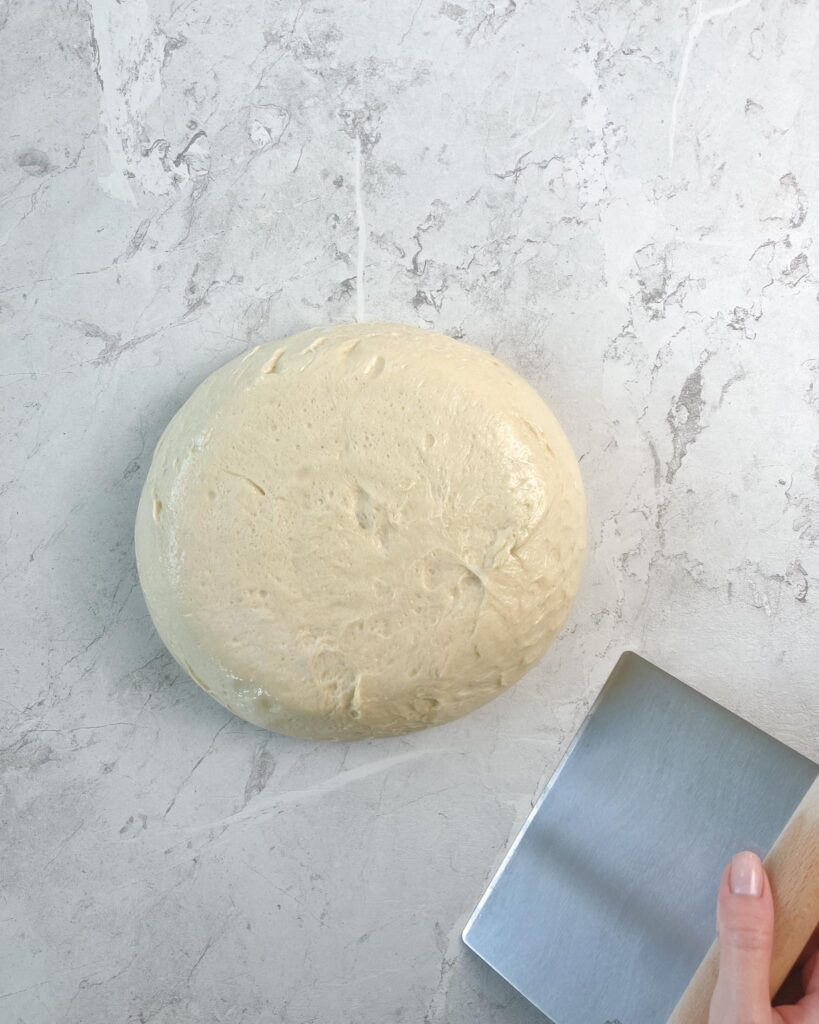
- Oil a large baking bowl. Transfer the dough to the bowl, and lightly oil the top of the dough as well. Cover the bowl and rise for five hours at around 75°F/24°C.
- Transfer the dough to the fridge and cold-proof for 10-15 hours or overnight.
Shape the strands
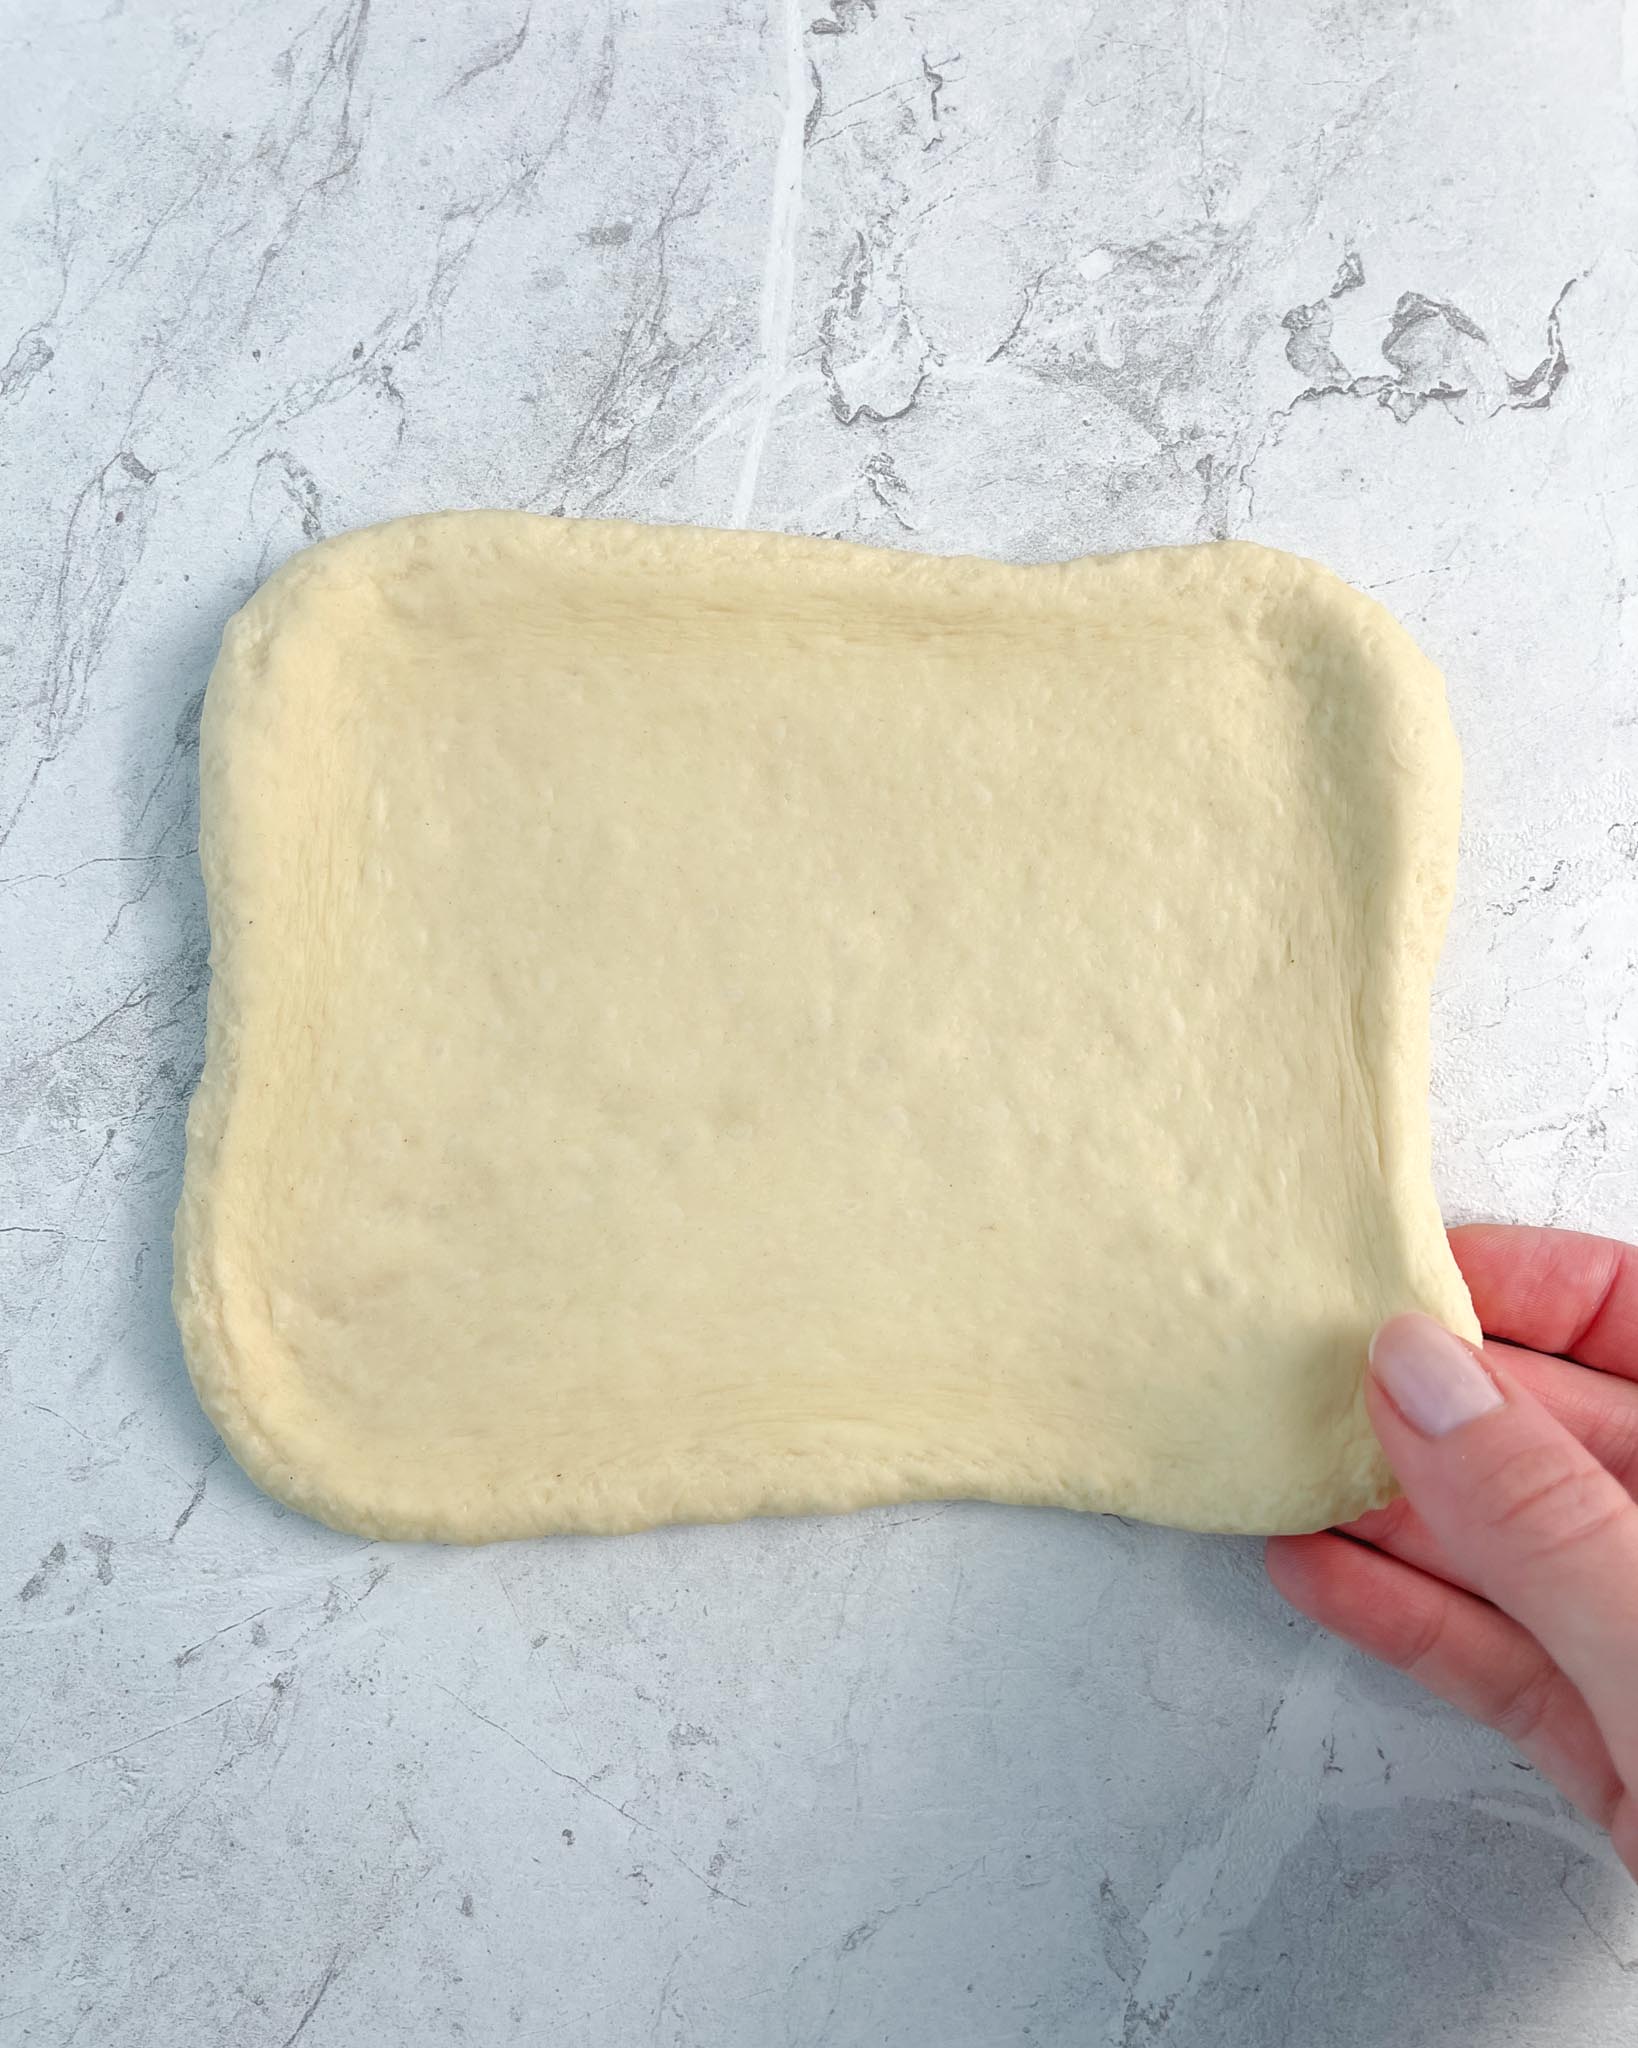
- Dump the dough onto a work surface. It's usually not necessary to flour the work surface at this point. The dough should be cold and stiff and shouldn't stick to your hands or surface.
- Divide the dough into 6 equal pieces. Use your scale for accuracy so that each strand ends up being the same size. Then roll each piece into seamless rounds. Cover with an oiled piece of plastic wrap and rest for 10 minutes.
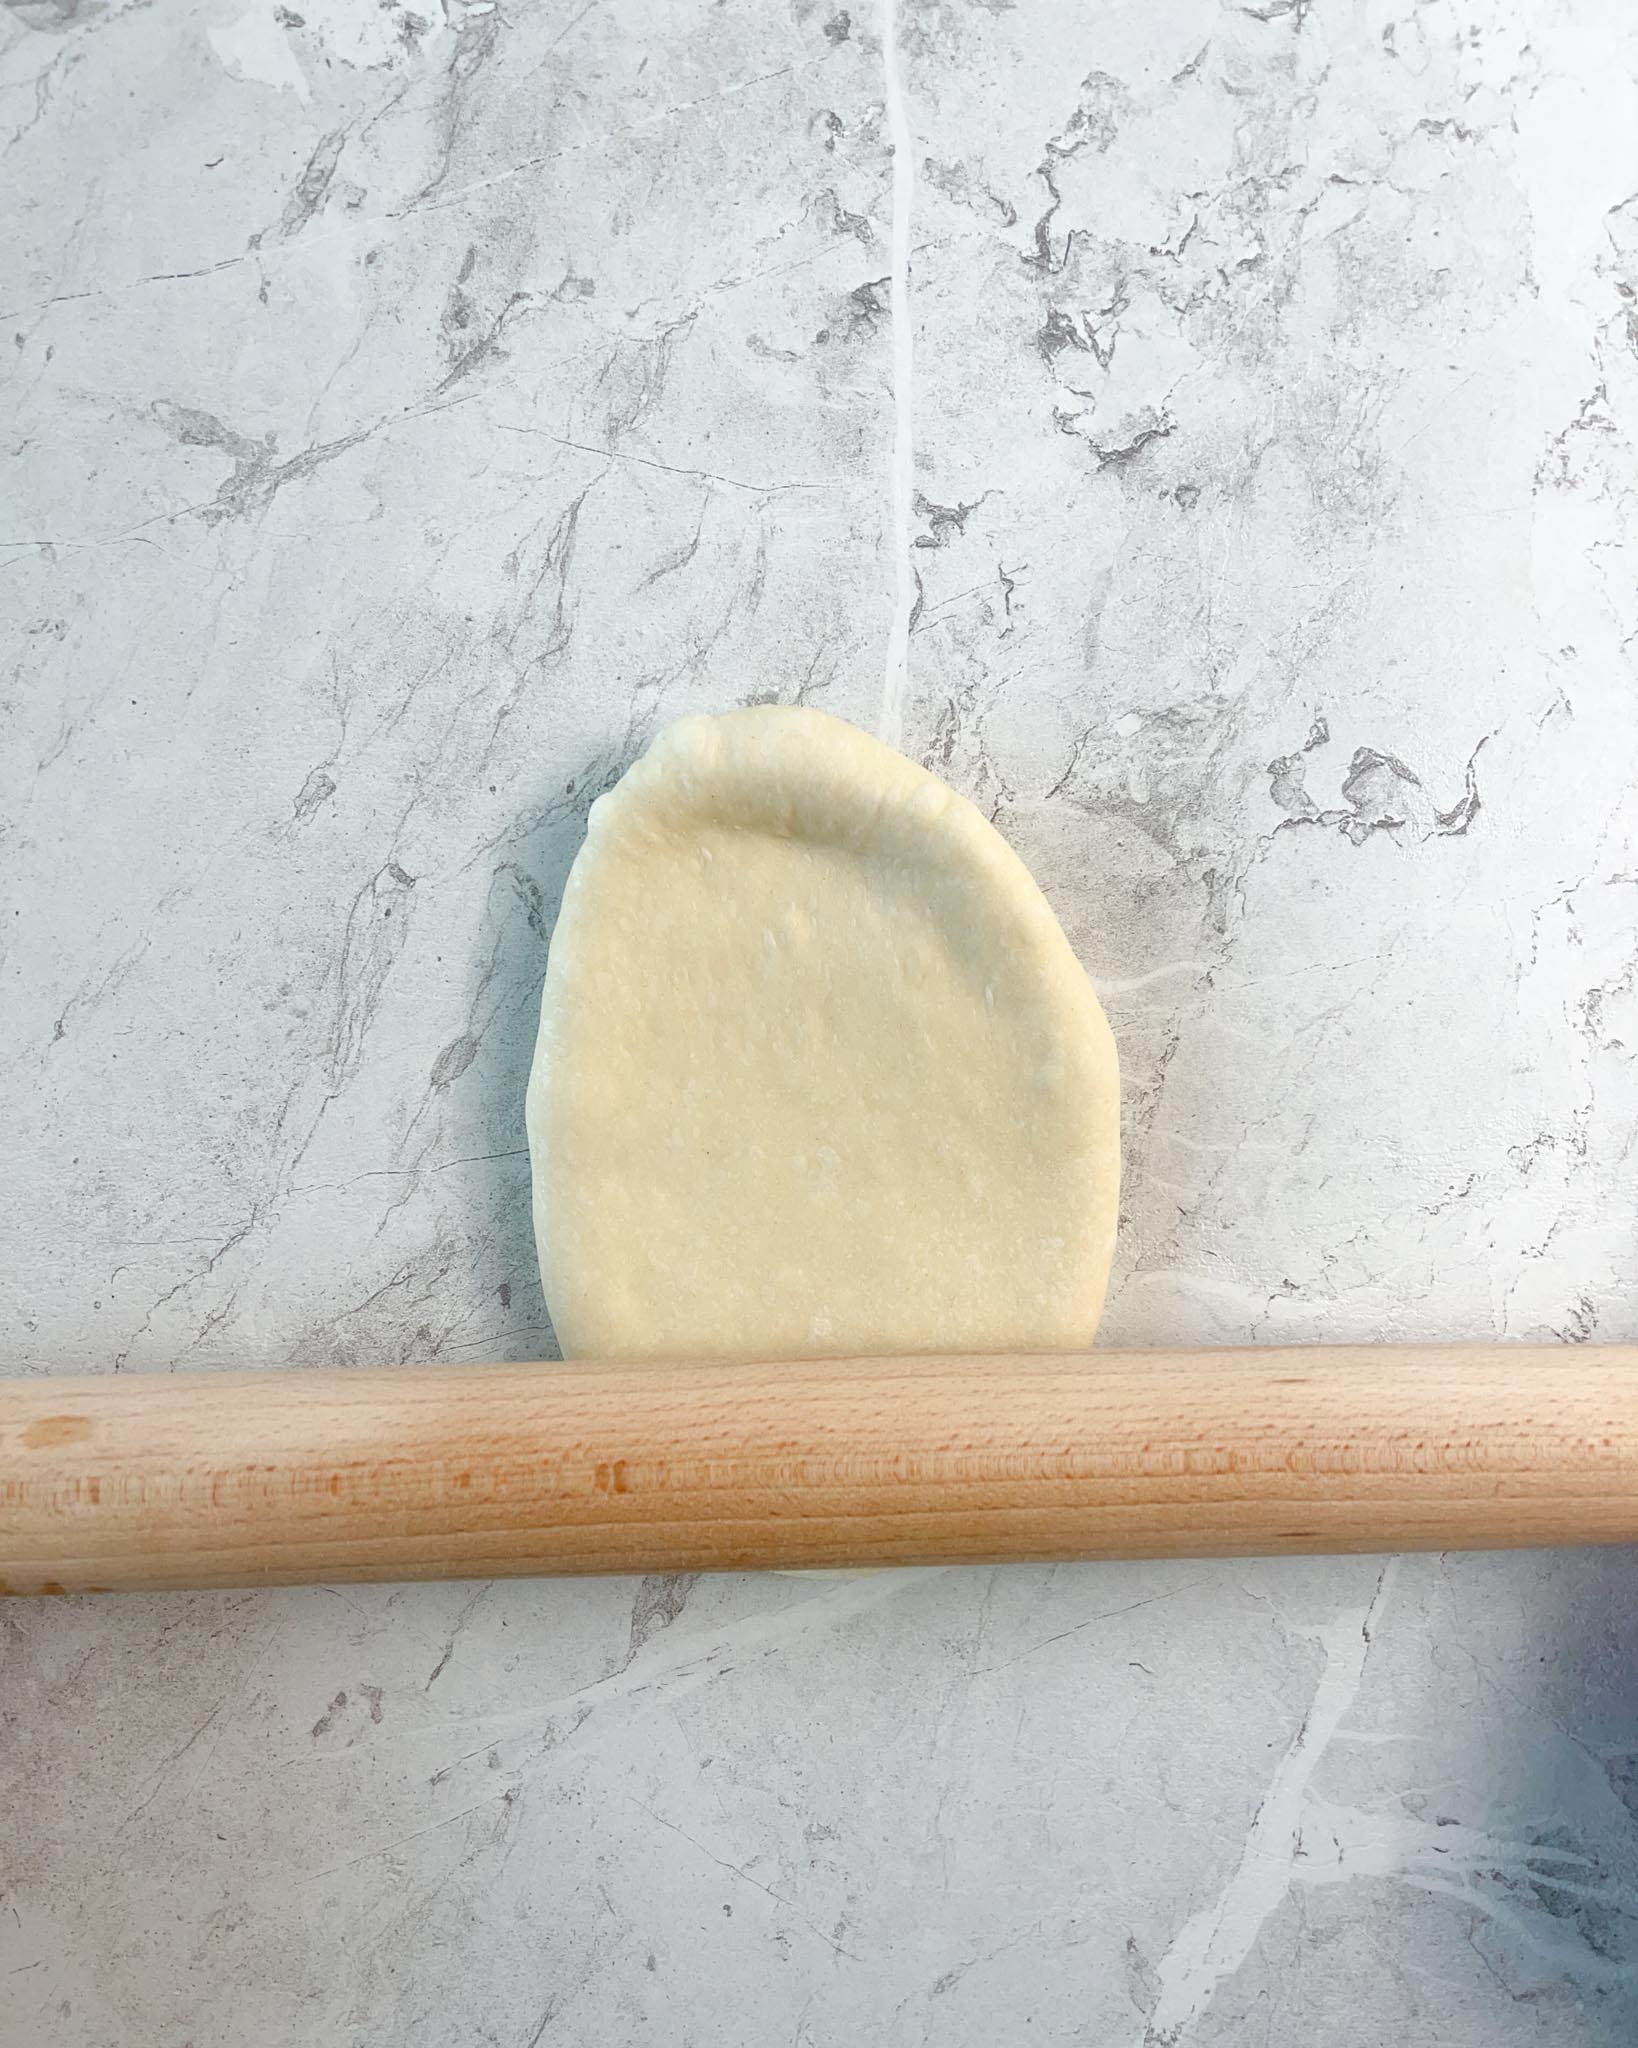
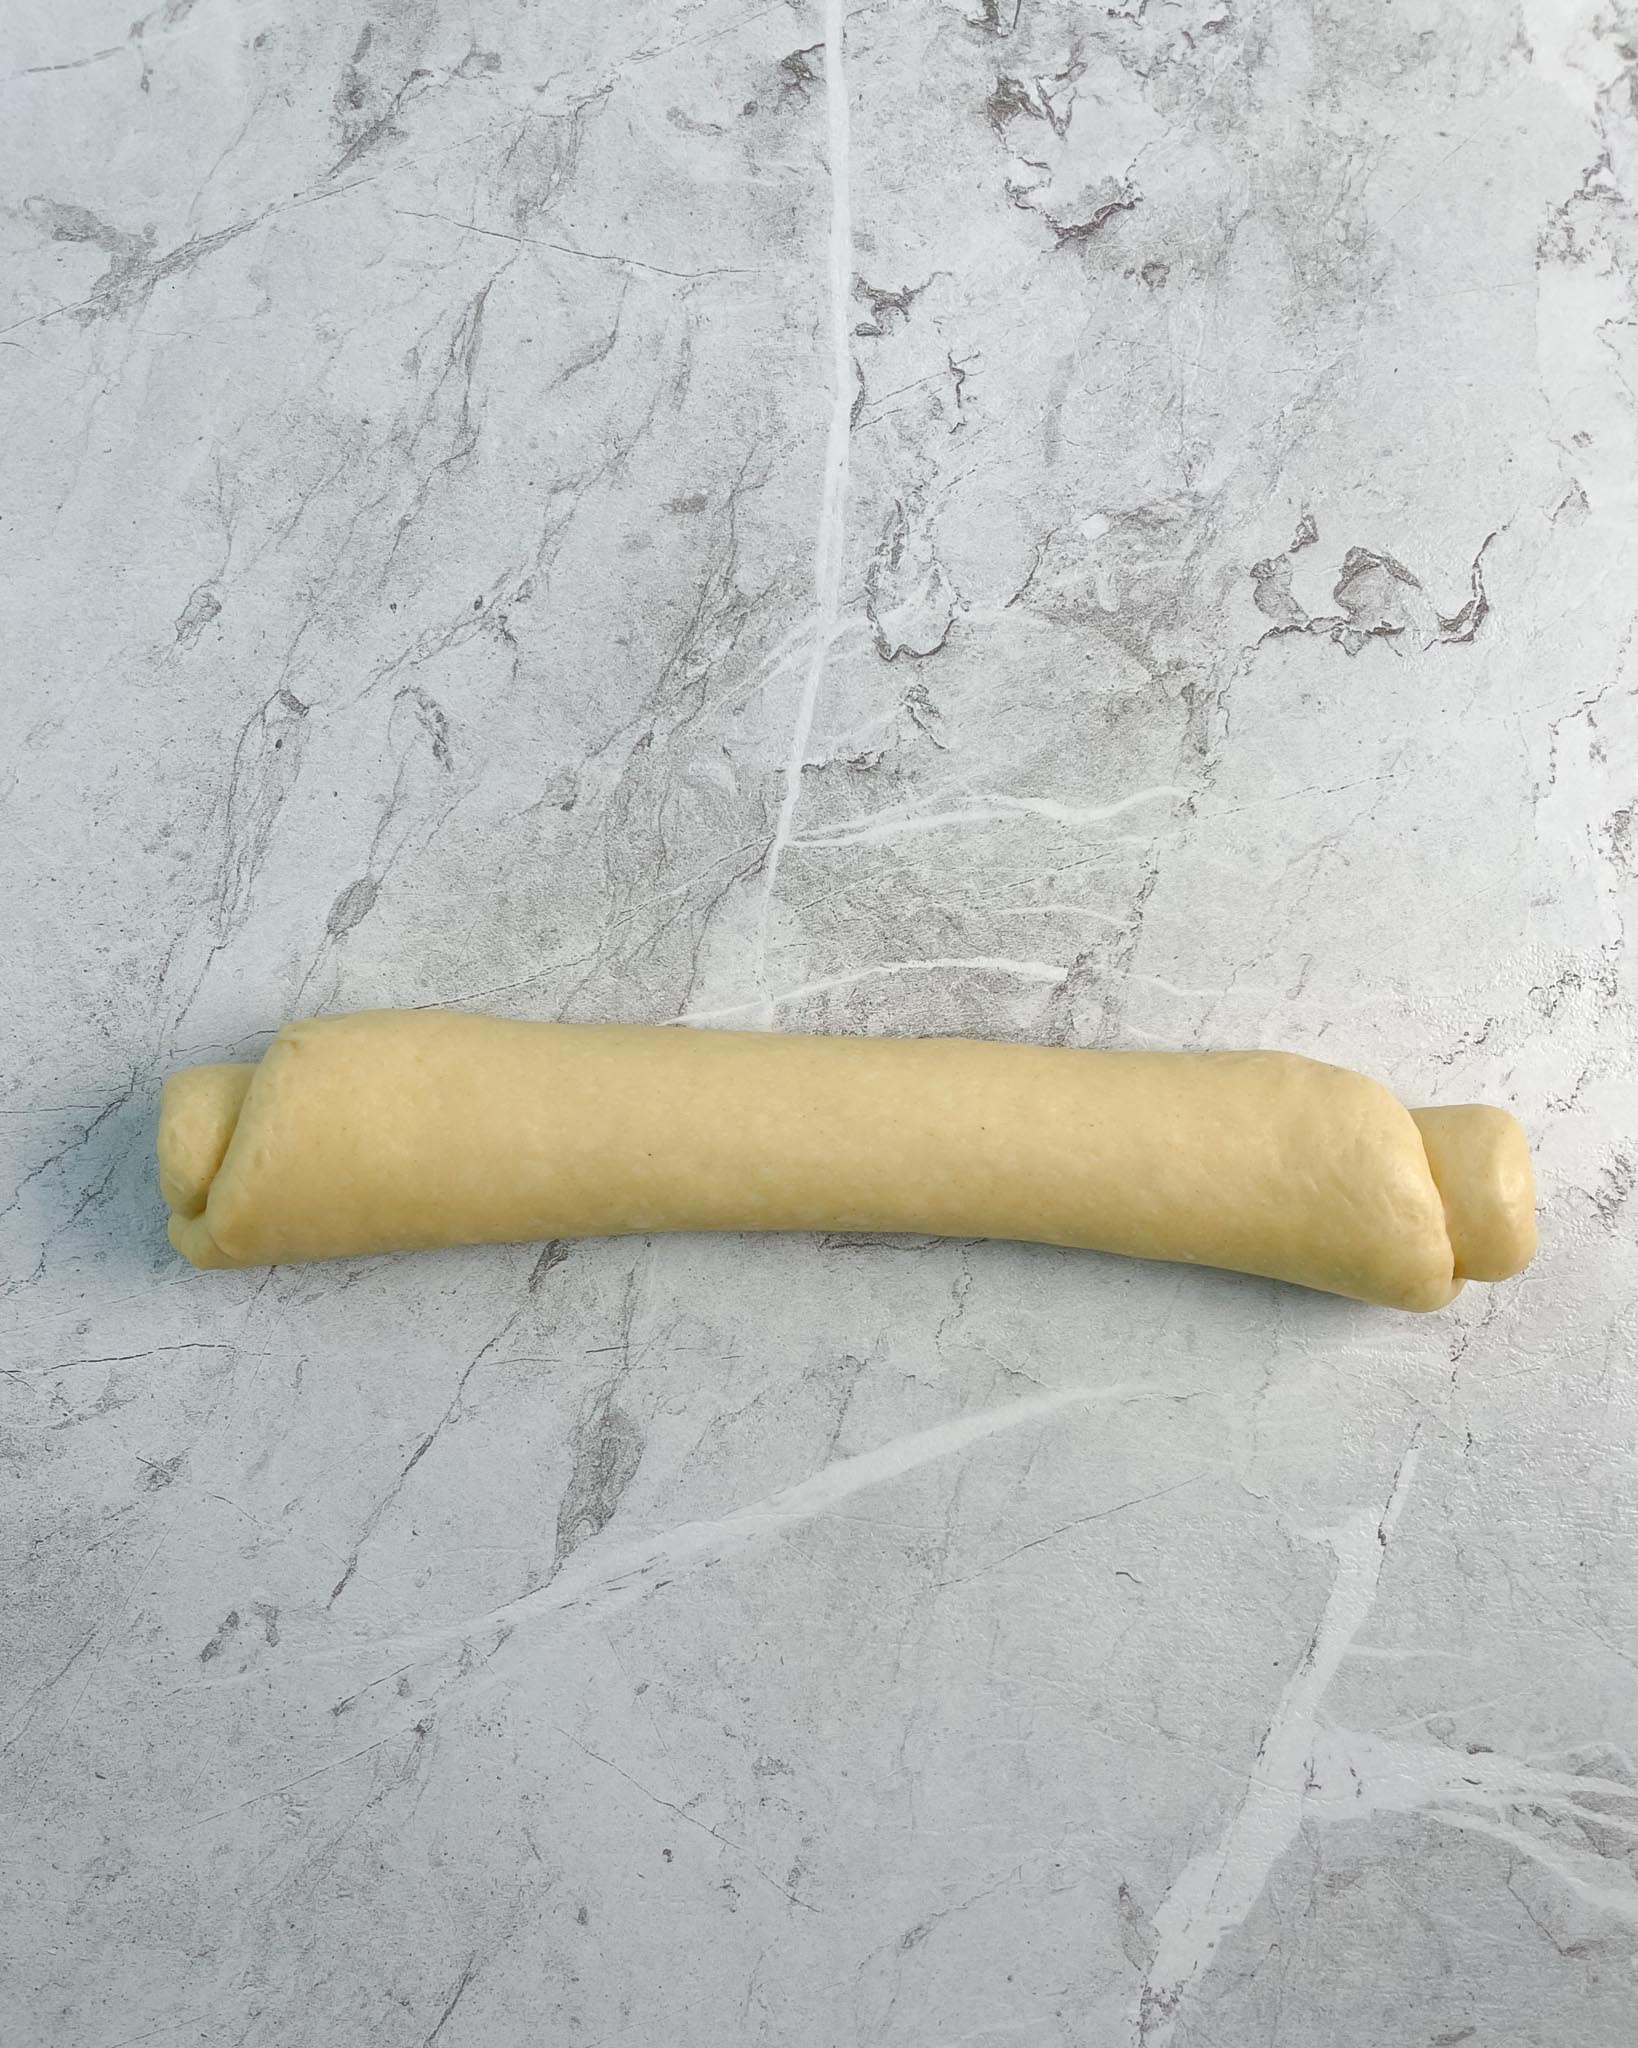
- Roll each round into rectangles about 8 in/20 cm long using a rolling pin. Grab one of the long sides of the rectangle and roll it up like a roulade. Suppose the dough resists you at any point, cover and let it rest for a couple more minutes. Repeat on all six dough rounds. Cover the roulades and rest for another 10 minutes.
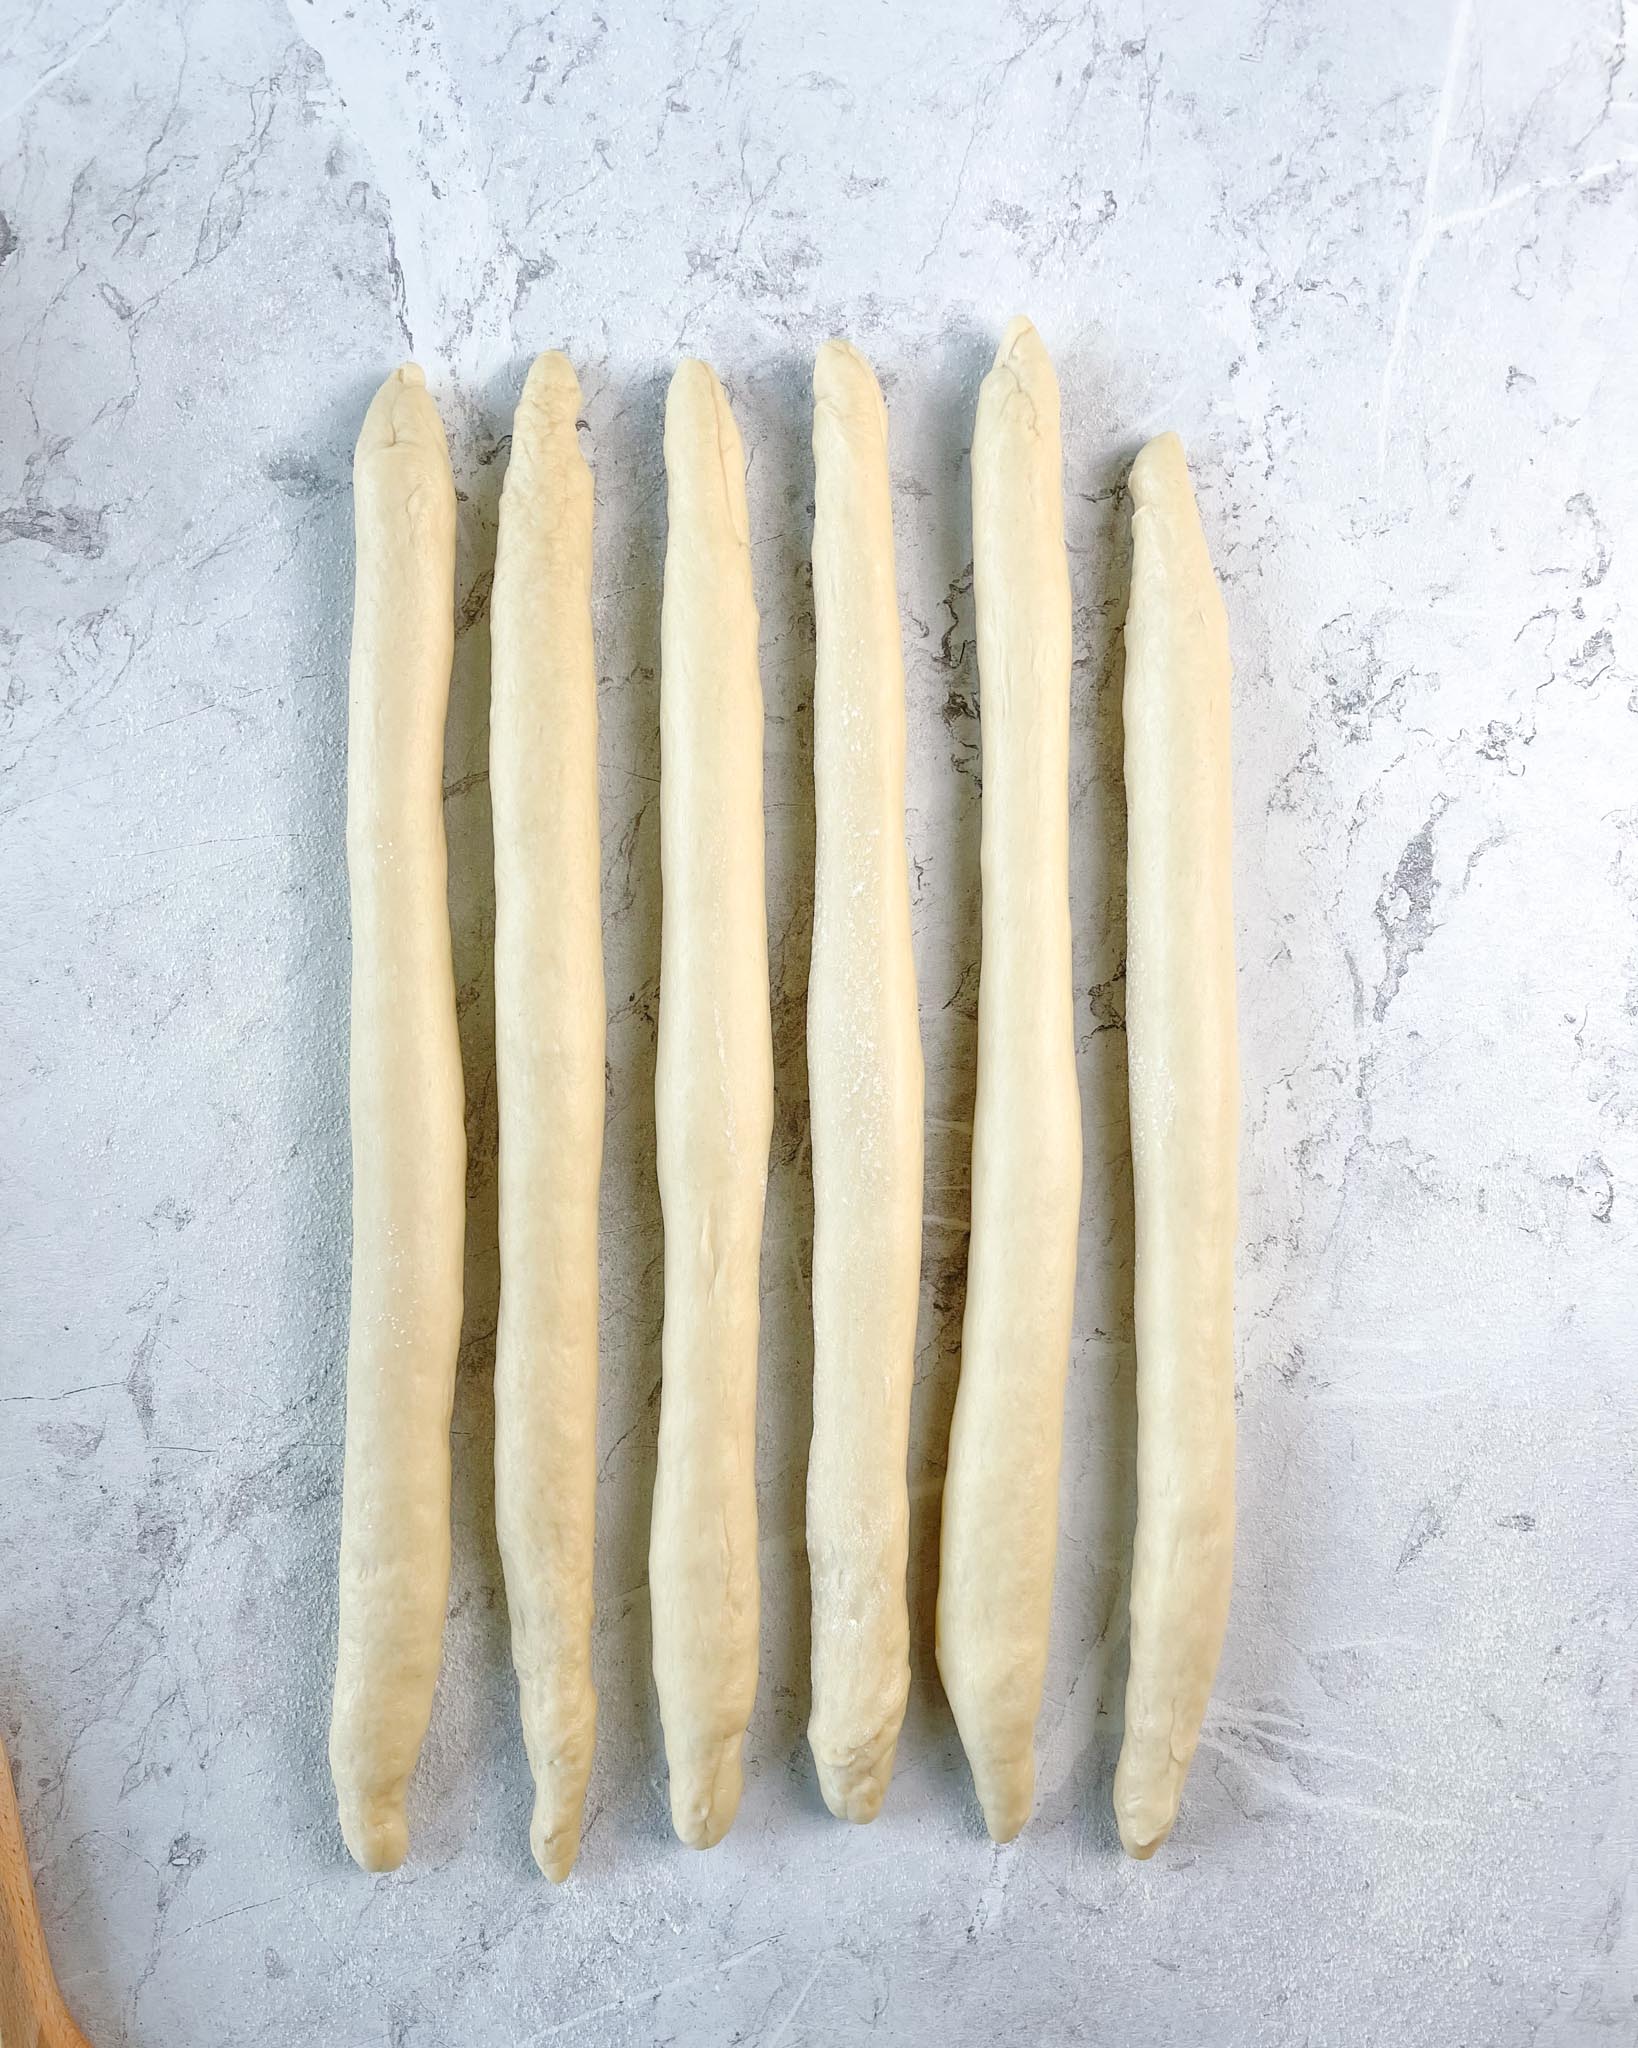
- Use your hands to roll and extend the roulades into 40-45 cm strands. I like to do this in two rounds; I'll start with strand 1 and extend it until it starts to resist me, then I'll continue with strand 2, extend until it resists, and repeat with all the strands. Then, I'll start with strand 1 again and extend it until it reaches the desired length of 40-45 cm.
- Flour your work surface, and if your dough strands are a little sticky, lightly flour those as well. Use a pastry brush to remove excess flour, and be sure not to use too much. Then, arrange the strands side by side – group together at the top and pinch to fasten.
6-strand challah
- I recommend watching the recipe video for this part. Writing this recipe, I realize just how difficult it is to explain braiding technique in writing, but I'll try my best:
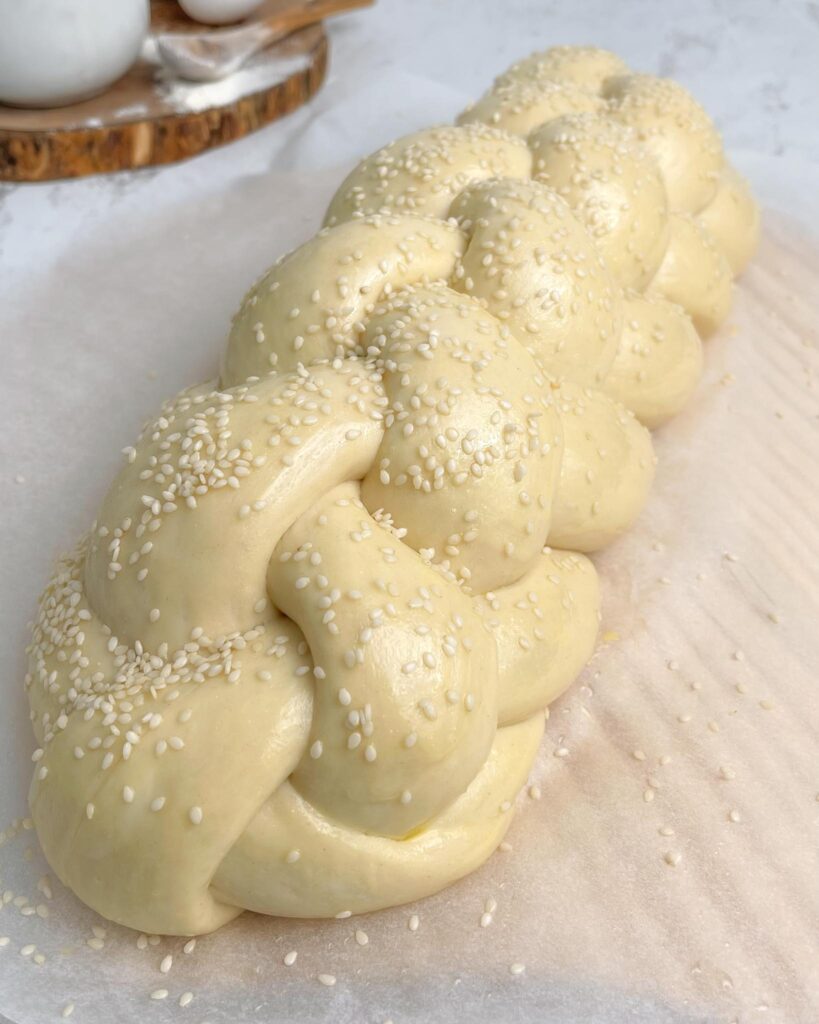
- Braid the challah a little loose to make sure it has room to expand during the final proof. First, the far-right strand goes over the far-left strand, far left strand goes over the far-right strand—a simple criss-cross.
- Now, for the repeating pattern, the far left strand goes to the middle. The second far-right strand goes all the way across. The far-right strand goes to the middle. The second far left goes all the way across. Far-left to the middle… and so on. Repeat all the way down to create your 6-stranded challah.
- Pinch and tuck the ends to seal your braid.
- Transfer your challah to a lined baking tray. Loosely cover the tray with plastic wrap and place the tray in a warm spot around 78°F/26°C*. Proof for 4-6 hours, or until the challah has risen and is nicely puffed up. The bread should jiggle when you shake the tray.
Bake
- Preheat your oven to 350°F/180°C.
- Mix up your egg wash by whisking together egg and water.1 egg, 1 tbsp water
- Gently brush your challah with egg wash and sprinkle sesame seeds on top.
- Bake for 25-35 minutes, until golden. Cover with foil if it browns too quickly. Internal temperature should be at 95C/203F when it is done.
- Transfer to a wire rack and cool completely before serving.

Hi Elise,
After watching you at insta I’ve just visited your site and downloaded 6 strands challah tutorial. Many thanks for your permission I wish to go for a try since I’m poor at challah work, will try for my best. Hope to share when success ????⚘????♂️???????? greetings from TR????????
Hello, Thank you for the recipe, I wonder if it is possible to form a challah before putting the dough in the fridge for overnight rising and then just bake it? At what temperature do you put the cake in the fridge for these 15 hours?
Barbara, Did you every try this (shaping and then into fridge), bake the next day? I’m looking to do the same and haven’t quite figured it out.
I was able to shape the bread and put it in the fridge. I took it out in the morning and waited about 2 hours to put it in the oven. It turned out great.
I’d love to know how to makes these recipes vegan. Appreciate any ideas.
Here are some of the most popular vegan recipes on the blog: The Ultimate Homemade Focaccia, Za’atar & Olive Oil Sourdough Bagels, Sourdough Baguettes in Challenger Bread Pan, 50% Whole Wheat Sourdough Sandwich Bread
Hi Elise. Im new to your site, excited to try your recipes. Do you make your own sourdough starter? If so, do you have a recipe? Or do you buy sourdough starter? Appreciate your response.
Hi Elise!
I’ve made the challah and it was amazing! It literally disappeared within minutes at the family table. I was wondering if I can alternate the oil with butter? How would that affect the dough?
Thanks for the answer
Cannot wait to make this today– I’m across the country from my recipe notebook and needed to make challah! No stand mixer in this place. As an experienced bread baker, is it safe to say I can knead by hand the whole time? Or is the dough a bit too wet to do by hand? Much appreciation. xx H
I don’t use a stand mixer when I use this recipe. It takes a bit to incorporate the oil into the dough, but other than that, I wouldn’t rate this any more difficult than a typical bread recipe. Turns out great for me every time!
Hi. What changes to use high protein AP bread? Have you tried that?
Thanks
Thanks for sharing this amazing recipe.my family loved it.will be sharing this recipe with my friends.they will like it.
This was perfect! I am super new to sourdough baking- this was only my second loaf of bread ever- and it turned out perfectly. It took a lot of time, but was not time consuming and the challah was amazing. I used everything bagel seasoning on top and it was a smash hit at Shabbat dinner. Can’t wait to try your other sourdough recipes!!
It tasted great, made as directed, but my challah didn’t come out as beautiful as yours. The pieces of the braid kind of melded together in the baking process and don’t look as distinct. Any advice?
Hi! Happy to hear the challah tasted great. As for the braiding, try sprinkling a little extra flour on the strands before starting the braiding process, and/or adjust the hydration level to fit with your flour – especially if the dough seemed sticky. Every flour is different, so sometimes adjustments are necessary.
Mine came out so beautiful!! I just love your thourough instuctions, and the baker’s schedule really helps!!
Wonderful recipe and the braiding video was so helpful! Can’t wait to try making your other recipes.
This recipe is so good! turned out beautiful!
Delicious! Thank you! I don’t have a mixer so I used the stretch and fold technique to knead it by hand instead. Turned out absolutely amazing! Definitely going to make again. The whole family loved it. Blessings to you! Thank you!
This bread was perfect! It was soft and fluffy and just right! Also, the braiding video was so helpful.
So far the recipe is great and self explanatory! Except I’m pregnant and forgetful and left my dough on the counter overnight instead of the fridge!! Is it ruined??? Help!!
Came out absolutely gorgeous! Thanks so much for all the recipes. I am trying to make my way through all of them.
Thank you for this wonderful recipe! I love challah and have just gotten started with sourdough so this was a lovely addition to my recipe collection.
My stand mixer broke last week, so I mixed and kneaded this by hand. I was tempted to add more flour as the dough is quite wet while making the oil additions, but I’m glad I resisted that temptation because it did eventually come together beautifully and is one of the best loaves I’ve made to date. I will definitely be revisiting this on a very regular basis!
Absolutely perfect Challah. It was moist, soft, luscious bread and my wildgrape starter brought a deep sourdough flavor out. This will definitely be a go to Challah recipe. Great Recipe!
This is an excellent recipe; one of the best results for challah I’ve had in a while. I doubled the recipe for my first attempt. Combined the weight of the oil and eggs, since I had already used my liquid measuring cup to gather egg yolks (was making macarons). I used 6 egg yolks and an additional whole egg to meet the total weight of 200g; added oil up to the 80 g.
For the bulk proof ferment, I put my mixer bowl into the fridge, covered the top, and allowed it to proof overnight. It tripled in bulk! Split the dough into three (roughly 600 g each), braided each ball into three-strand braids and then braided those together. Since it was late by the time I got this all done, I put the formed loaf into the fridge, covered, and allowed it to proof overnight. It doubled very nicely.
All of this to say that even with doubling the recipe and all of the additional proofing time, the final result was GORGEOUS! Will definitely be replacing my standard recipe with this one; glad to also be done with the taste of the large amounts of commercial yeast seen in so many traditional challah recipes. Cheers!
Hello Elise, I would like to say that I love how you write your recipes.
You write them very clearly and take the time to include the ingredients along with the measurements in the step-by-step process of each recipe.
Thank you so much for caring about your audience.
God bless you.
Big hug from Brazil.
I made this last week and followed exactly and it turned out gorgeous. My only thing I didn’t like was it wasn’t sweet enough I like a sweet challah. Made it again yesterday by substituting the honey for the same amount of sugar I use in my other recipe…..not turning out so well. It didn’t rise hardly at all during either rise and then the dough braiding was extremely sticky. It’s on its final proof now, which I don’t have high hopes for because it’s going wide and not tall. Any suggestions on making it sweeter and if sugar can be substituted for honey?
Thank you for sharing your experience! I haven’t personally tested making the challah significantly sweeter, so I can’t give a definite answer. I would recommend gradually adding sugar, or using a mixture of honey and sugar, and adjusting the hydration accordingly. This might take a few tries as you’re altering the recipe quite a bit. Happy baking!
This is by far the best recipe I’ve found for sourdough challah. Light but not too airy—it’s challah after all!—pillowy, and I find the times to be really flexible, give it take an hour for each step (just making sure if you put the levain in the fridge after 3 hours, for example, you add extra rise time in the next step). I have five kids and am often needing to adjust to accommodate the many needs throughout the day, so flexibility is a must! I usually cold proof the levain overnight per the recipe, so refreshing my starter and building the levain is day one. But I’ve found this recipe can be easily shortened by adding all the ingredients at once and doing a longer bulk fermentation instead of bulk and then bulk cold ferments. I have tested adding the oil last and all at the same time with a x6 batch of the same dough and there was no difference in the final loaf. So second day, I mix the levain with all the ingredients, let it rise 6-8 hours (it’s summer and we keep our home at 74-75 degrees so ferment times have been way shorter for me), then shape and let it rise for 2-4 more hours. Basically, 10-12 hours and you can go longer on the bulk ferment or the shaping with great results, just watching the total rise time and baking when it passes the poke test. This allows me to bake the second day! Obviously some flavor and texture is sacrificed without another cold proof, but my point is that this is really flexible and if you need to shorten the process, you can with great results!
Thank you so much for sharing, Katie!
I am QUITE disappointed. Using a stand mixer. I have been “mixing” for 45 minutes . Added 1/2 cup of flour and it STILL isn’t coming together. Windowpane test? I don’t even see that coming UNLESS I add MORE flour and continue mixing for god knows how long. I also see no S&F. Trying ti blend two different styles of mixing/fermenting just ain’t cutting it. Sorry…
Hi Bob. I’m sorry to hear you’re having trouble with the dough. To troubleshoot, can you let me know what type of flour you’re using and if you measured the ingredients in grams? Precision is really important, especially with hydration levels, so I want to make sure we’re on the same page. Also, using a stand mixer shouldn’t take anywhere near 45 minutes—so something definitely seems off. Give me a few more details, and we can figure this out.
Fantastic balanced recipe. I swapped oil for butter and got perfect results. Awesome oven rise, highly recommend!
Thank you, Brandon!
Your recipes are incredible. I’ve tried a few now and they are all great.
This challah reciper is now a staple in my house nearly every week.
I follow your recipe until after the cold proof. I take it out of the fridge, braid & then let sit for a few hours- then bake.
Thank you!