Homemade Sourdough Donuts
This website contains affiliate links.
Some of the links below are affiliate links. This means that, at no additional cost to you, Bread By Elise may earn a commission if you click through the link and finalize a purchase. Please read our Privacy Policy for more details.
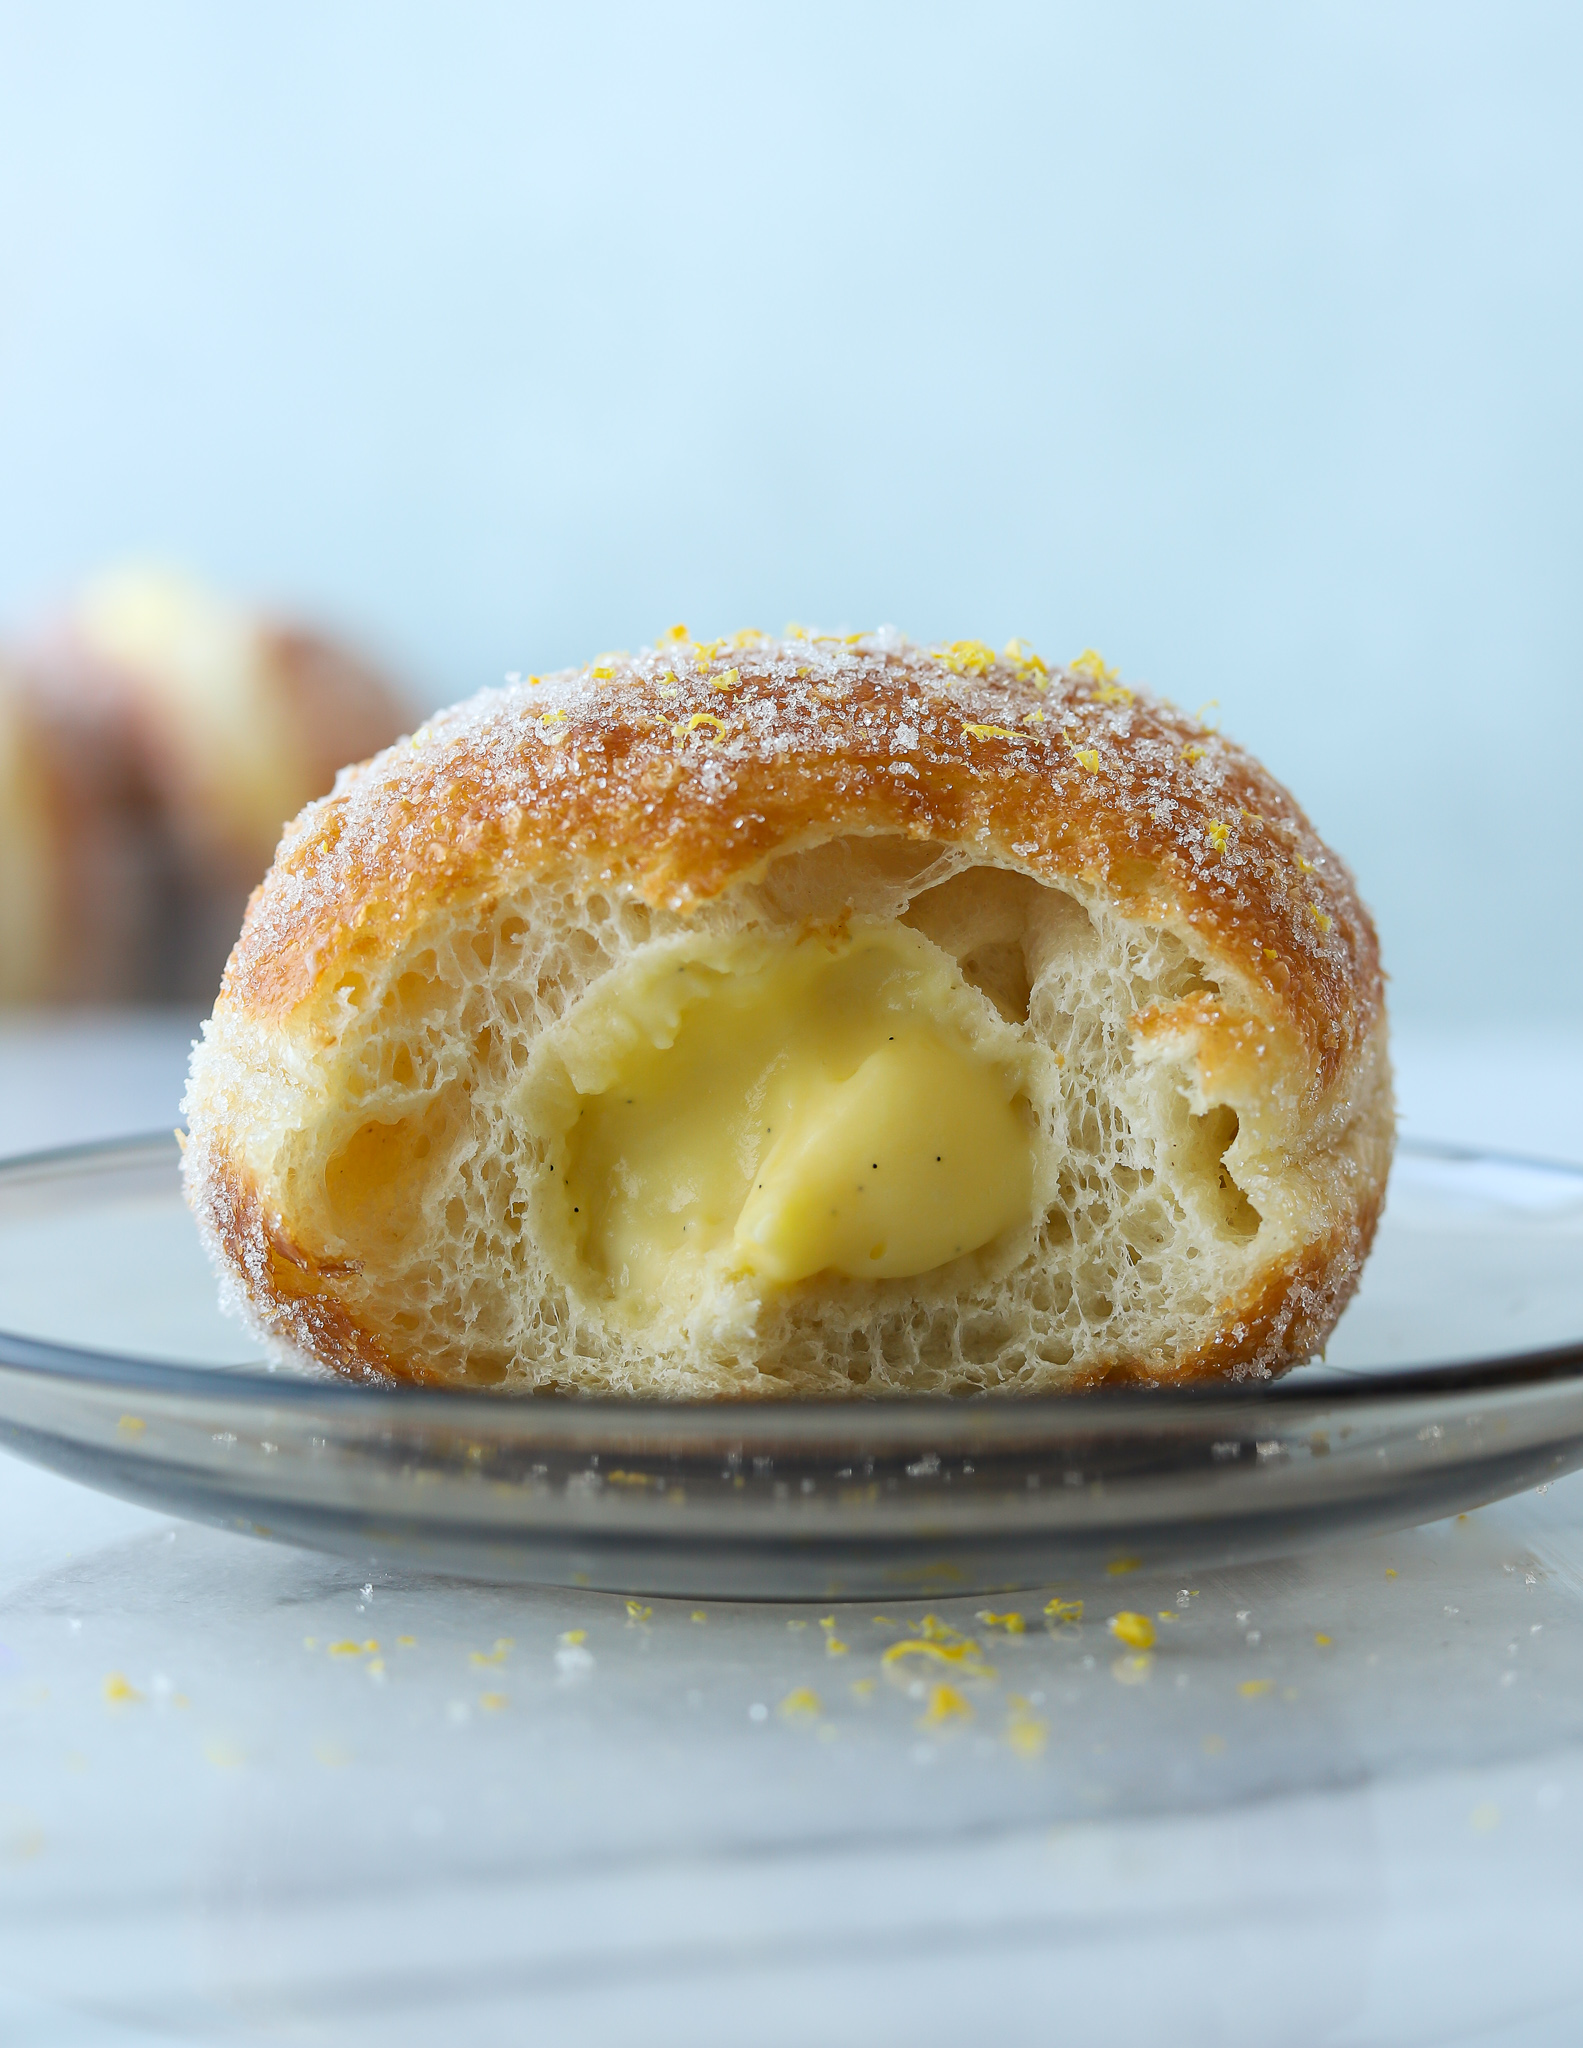
These sourdough cream-filled doughnuts are deliciously light and soft – filled with a creamy and rich vanilla pastry cream.
I recommend serving the doughnuts the same day as you fry them. Day-old doughnuts are simply not that great! Please take the time to read through the whole recipe before you begin, and remember to check out the Baker’s Schedule at the end of this post to help plan out your bake.

Table of contents
Recipe Run Through
Day one
Prepare Stiff Levain
Mix sourdough starter, water, and flour in a bowl. Cover, and rise in a warm spot (75°F-78°F/24°C-26°C) for 8-10 hours, until tripled in size.
Make The Main Dough
- Add the flour, stiff levain, eggs, whole milk, sugar, and salt to the bowl of your stand mixer fitted with a dough hook. Mix until just combined. It does not matter if the dough is a bit lumpy at this point. Cover, and rest/autolyse for 20 minutes.
- After the autolyse, continue mixing for 5 minutes.
- After 5 minutes, you can slowly start to add cubed, softened butter. When you’ve added all the butter, scrape down the sides of your bowl and continue mixing at medium speed for 15-25 minutes. Do the windowpane test to check if your dough is ready:

How to perform the Window Pane test
The Window Pane test is one of the best ways to tell if you have kneaded your dough long enough. Hold a corner of your dough with both hands and slowly stretch it out. If you can stretch the dough until it’s thin and nearly translucent (without tearing), it’s ready to go! If the dough tears quickly, it needs to be kneaded longer.
- Transfer the dough to a clean bowl, cover, and proof in a warm spot (75°F-78°F/24°C-26°C) for 6 hours. If you don’t own a proofer box, you can keep the dough in the oven with the light turned on and the oven door slightly open.
- I like to do two gentle folds during proofing, one after 1,5 hours and one after 3 hours.
How to perform a fold


Grab a side of the dough, gently stretch it up, and fold it over itself. Repeat all around.
- After 6 hours, place the dough in the fridge and cold-proof for 6-8 hours.
Meanwhile, Make The Vanilla Pastry Cream
- Start by gathering all your ingredients.
- In a bowl, whisk together egg yolks, sugar, cornstarch, and a small pinch of salt.
- Cut the vanilla bean pod in half (lengthwise) and scrape off the vanilla bean with a knife.
- Combine the milk and vanilla bean in a medium-sized pot. Heat over medium heat until tiny bubbles form around the edges of the pot, almost to a boil.
- Take the pot off the heat and slowly pour it over the egg mixture, a little at a time, constantly whisking.
- Place a fine-mesh strainer over the pot and strain everything back into it. Heat over medium heat, still constantly whisking, until the pastry cream is thick and shiny.
- Remove from heat and mix in the butter. If you’re using vanilla extract, you want to mix it in now.
- Transfer to a bowl and cover with plastic wrap, touching the entire surface of the cream. This prevents skin from forming on top of the pastry cream. Cool to room temperature, then place it in the fridge.


Note: The vanilla pastry cream can be made in advance and refrigerated for 3-4 days.
Shaping And Final Proof
- Divide the dough into 15 equal pieces (60g each) and roll into seamless rounds. Place the shaped doughnuts on baking trays lined with floured parchment paper cut into about 5in/12cm squares. The parchment paper pieces are for easier transfer later on. Loosely cover the trays with plastic wrap.
- Place the baking trays in the oven with the light turned on and the door slightly open. You want the temperature to be around 78°F/26°C. You can also use a proofer box if you own one. Proof the doughnuts for 10-14 hours or until they’ve doubled in size.


Day Three
Fry The Doughnuts
- Pour oil into a heavy-bottomed pot or Dutch Oven set over medium heat. Heat the oil to 180 °C-185°C/356°F-365°F. I highly recommend using a thermometer.
- Carefully lower the doughnuts into the oil and fry them for about 2 minutes on each side. You want the top side of the dough pieces to hit the oil first.
- Remove from oil with a metal slotted spoon and transfer to a cooling rack lined with paper towels.
- Toss the fried doughnuts in sugar while they’re still warm.
- Repeat on all remaining doughnuts.


Assembly
Take your vanilla pastry cream out of the fridge and give it a good stir. Insert a small knife into the center of the cooled doughnuts (anywhere on the white line) to make a hole. Then, with a piping bag, generously fill each doughnut with vanilla pastry cream.
Shop the Tools


Watch Me Bake
Sourdough Cream Filled Doughnuts


Sourdough Cream Filled Doughnuts
Equipment
- Stand mixer
- Brød & Taylor proofer box (optional, but recommended)
- Parchment paper cut into 5in/12cm squares
- Dutch oven or Heavy-bottomed pot
- Metal slotted spoon
- Candy/oil thermometer
Ingredients
Stiff Levain
- 38 g active sourdough starter white, 100% hydration
- 38 g water
- 76 g bread flour
Main Dough
- 390 g bread flour or 50/50 bread flour/all purpose
- 152 g stiff levain
- 100 g eggs Approx. 2 eggs
- 128 g whole milk cold
- 75 grams sugar
- 7 grams salt
- 75 grams unsalted butter softened, cubed
Vanilla Cream Filling
- 360 g whole milk
- 1 vanilla bean pod or 1 tsp vanilla extract
- 60 g sugar
- 23 g corn starch
- 4 egg yolks
- pinch of salt
- 25 g unsalted butter
Other
- 2 litre frying oil
- 200 g sugar for coating
Instructions
Stiff Levain
- Mix sourdough starter, water, and flour in a bowl. Cover, and rise in a warm spot (75°F-78°F/24°C-26°C) for 8-10 hours, until tripled in size.
Main Dough
- Add the flour, stiff levain, eggs, whole milk, sugar, and salt to the bowl of your stand mixer fitted with a dough hook. Mix until just combined. It does not matter if the dough is a bit lumpy at this point. Cover, and rest/autolyse for 30 minutes.
- After the autolyse, continue mixing for 5 minutes.
- After 5 minutes, you can slowly start to add cubed, softened butter. When all the butter is added, scrape down the sides of your bowl and continue mixing at medium speed for 15-25 minutes. Do the window-pane test to check if your dough is ready.
- Transfer the dough to a clean bowl, cover, and proof in a warm spot (75°F-78°F/24°C-26°C) for 6 hours. If you don't own a dough proofer, you can keep the dough in the oven with the light turned on and the oven door slightly open.
- I like to do two gentle folds during proofing, one after 1,5 hours and one after 3 hours.
- After 6 hours, place the dough in the fridge and cold-proof for 6-8 hours.
Vanilla Pastry Cream
- Start by gathering all your ingredients.
- In a bowl, whisk together egg yolks, sugar, corn starch, and salt.
- Cut the vanilla bean pod in half (lengthwise) and scrape off the vanilla bean with a knife.
- In a medium-sized pot, combine the milk and vanilla bean. Heat up over medium heat until you can see tiny bubbles forming around the edges of the pot, almost to a boil.
- Take the pot off the heat and slowly pour it over the egg mixture a little at a time while constantly whisking.
- Place a fine-mesh strainer over the pot and strain everything back into the pot. Heat up over medium heat, still constantly whisking, until the pastry cream is thick and shiny.
- Remove from heat and mix in the butter. If you're using vanilla extract, you want to mix it in now.
- Transfer to a bowl, cover with plastic wrap that is touching the entire surface of the cream. This is to prevent skin from forming on top of the pastry cream. Cool to room temperature, then place it in the fridge.
Shaping And Final Proof
- Divide the dough into 15 equal pieces (60g each) and roll into seamless rounds. Place the shaped donuts on baking trays lined with floured parchment paper cut into about 5in/12 squares. The parchment paper pieces are for easier transfer later on. Loosely cover the trays with plastic wrap.
- Place the baking trays in the oven with the light turned on and the door slightly open. You want the temperature to be around 78°F/26°C. You can also use a proofer box if you own one. Proof the donuts for about 10-14 hours or until they've doubled in size.
Fry The Doughnuts
- Pour oil into a Dutch Oven or heavy bottomed pot set over medium heat. Heat the oil to 180 °C-185°C/356°F-365°F. A thermometer is highly recommend to manage the temperature.
- Carefully lower the doughnuts into the oil and fry them for about 2 minutes each side. You want the top-side of the dough pieces to hit the oil first.
- Remove from oil with a metal slotted spoon and transfer to a cooling rack lined with paper towels.
- Toss the fried doughnuts in sugar while they're still warm.
- Repeat on all remaining doughnuts.
Assembly
- Take your vanilla pastry cream out of the fridge and give it a good stir. Insert a small knife into the center of the cooled doughnuts (anywhere on the white line) to make a hole. With a piping bag, fill each doughnut with vanilla pastry cream.


Hi there!!
I never used sourdough in sweet doughs, except for one time and it was terrible! the rolls were so acidic and sour! But i have started a new sourdough so i’m testing again!
since i keep my starter in the fridge, could i use it straight from the fridge to make the levain?
thanks in advance!
Hi! No, you need to make sure your starter is active before making this recipe. Take it out of the fridge 2-3 days in advance and feed it every 12 hours until you’re planning to bake with it. Happy baking!
Hi, Elise! Can you please tell me how do you make a white active sourdough starter? I`m using your sourdough starter recipe. I take it out of the fridge 2 3 days in advance and feed it with white flour only ( all purpose) keeping the proportions : 20 grams sourdough starter , 20 grams all purpose white flour and 20 grams water? Thank you
Hi. Yes, exactly! Just give it a couple feedings with only white flour and you’re good to go.
I made this recipe. It’s great. My little boy really liked it. He likes best strawberry marmalade so instead using vanilla cream I made strawberry marmalade.
Hi Elise, this really works well for me and taste soooo good. My problem is with shaping and frying. After the final proofing the shape is still round. So when I fry them they sink and looks like a ball after. Any tips?
Thanks for your feedback, Maya! If they sink, it usually means that they are under-proofed. Please make sure your starter is active and that you let the donuts double in size before frying them.
Could I roll this dough out to make ring donuts? Or do you think the tension in the final shaping is needed?
Sure, you can!
Hi Elise,
How do i understand the bulk fermentation if I want to check the dough rise in percentage like is it 50 % or 70% likewise recipe says leave it for 6 hours
This will be the second time I made this recipe. The first time was a REALsuccess..!!! I didnt use the vanilla cream because my little boy love Strawberry jam. Tusen takk..!!
Delicious! Amazing! I ended up doing the final proof for longer, doing part in a warm envrionment and part in the fridge overnight and they turned out incredibly well! So delicious. I put lemon curd in my doughnuts, and they were amazing. Thanks so much for your recipe!
Hi Elise,
I’ve tried your recipe and it came out perfectly. I really love the fact that you are making everything using sourdough. It’s much healthier and helping me not feel guilty eating a donut anymore 🙂
Why did you use a stiff starter instead of a liquid one for this recipe?
A liquid starter would ferment the dough faster resulting in a much more sour final product. Stiff starters slow down the fermentation and produce a product that is less sour.
Love this recipe! Turned out delicious. Making them a second time now. When you say fold at 1.5 hours then 3 hours during proofing do you mean 3 hours from the beginning or 3 hours after the first fold? Thank you!
Hi Megan! I mean 3 hours from the beginning 🙂
Thank you for such a great recipe. I’ve made them several times for gatherings and shared your recipe with friends 🙂
Thank you so much
I’ve seen your work over Instagram and instantly fell in love with your talent!!
I will definitely try out your recipes ❤
How do I stop my donuts from turning themselves over can’t get the white line? Many thanks Sean
If the doughnuts are very spherical, the air heats up and expands on the bottom, and the doughnuts will spin.
If the doughnuts are more flattened, they won’t flip as the air expands, and you will get the pale line around the equator 🙂
Mine flattened on proofing.
Nice recipe. I cooked these after everyone had eaten and no-one was hungry. I still got requests for seconds!
I rounded off the ingredients eg 128g – 130g (pet hate is the ‘exact’ conversion of lbs/oz to g.)and at the end I just divided the dough into 4, then each 1/4 into 4, to get 16 doughnuts that each weighed 60g+/-2g
WoW! I will be making these again! Thank you for your recipe.
Hi elise.. been following you on Instagram for a while and ive tried your sourdough donuts recipe and it was bomb!! so pluffy and airy.. Question is, can you please share the ratio on the ingredients as im keen to halved the recipe. Its only me and my partner at home so 15 donuts seems a lot. Thanks!!
I love this recipe but I keep getting blisters especially on one side that hits the oil first. Do you have any idea why this happens?
Elise, I followed your recipe to make sourdough donuts and it was successful! This is the first time for me to make a sourdough bread.
Thanks for your recipe!
The donut is really soft, but the taste is a little bit sour.
I proof the donut exactly the same until finished the cold proof. And I made the final proof in room temperature by about 12.5 hours.
Should I shorten the proofing time in the final proof?
Thanks!
Omg! I just used your recipe and they are delicious! Thank you! I found your recipe easy to follow and very informative.
I’m really excited to try making these donuts for the first time! They look beautiful. Question for you- if I don’t have a stand mixer, do you think it’s possible to do the Day Two steps by hand? Any tips? Thanks!
I highly recommend using a stand mixer for this recipe.
The best recipe. I’m very new to making sourdough pastry goods. They came out perfect.
Beautiful fluffy donuts.
I’m fairly new to sourdough baking and love trying different things. I was wanting donuts so thought I’d give it a go….turned out perfect and were the perfect Father’s Day gifts!! I did three filling varieties….jam, cream (as per recipe) and Nutella cream. Thank you for sharing the recipe.
Maravilhosos!
Incredible! Such a great recipe. Thanks!
I just made these ans they are…..
AMAZING!
I read through the recipe 2 or 3 times because I was a little intimidated, but they are so easy to make!